How to Create and Process Billings & Invoices
This document outlines how to use the Finance module in ChildFriendly to view, generate, edit, and manage billings and invoices for families at your center, including recurring tuition, custom one-time charges, sponsor allocations, and payments.
Last updated 3 months ago
Step 1: Access the Finance Module
To begin working with billings, open the Finance module from your ChildFriendly dashboard.
The Finance module is where you will find all information related to billing and payments for all families at once.
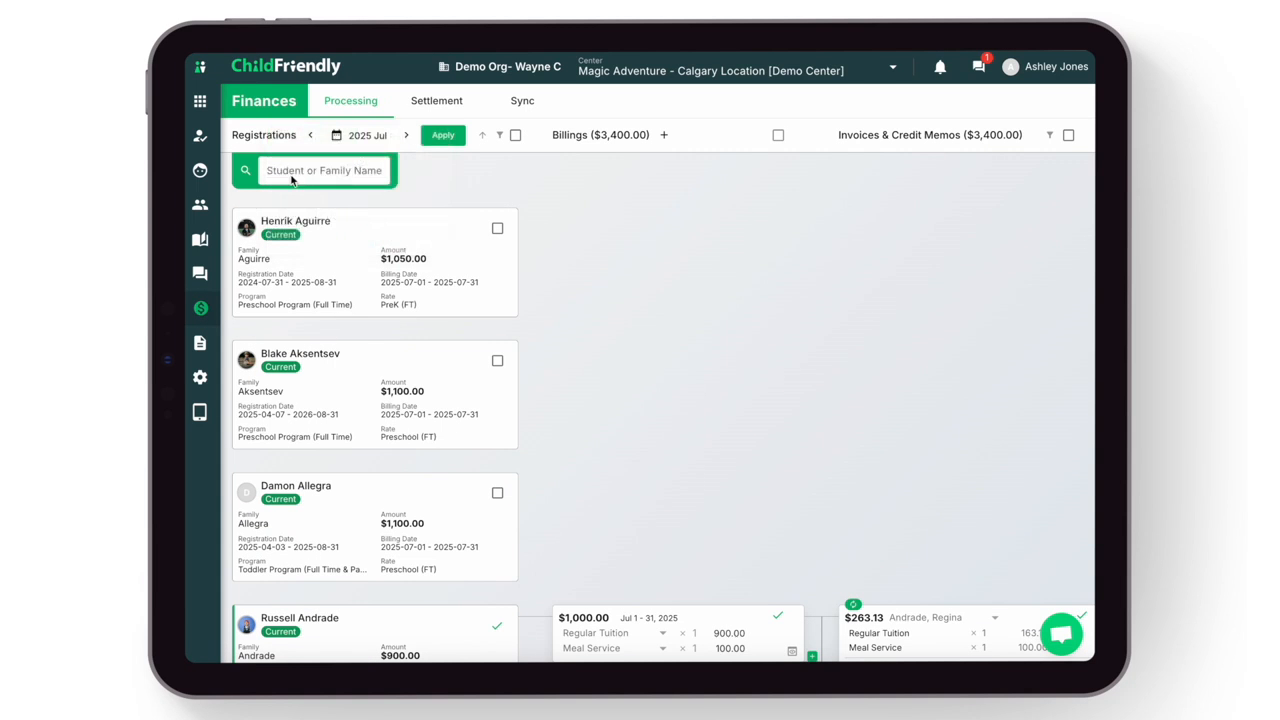
From here, you can view all billings for a specific time period for all registered families at your center. You can also use the search bar to find a specific student or family.
Step 2: Review Child and Billing Details
The first column displays the child’s information, including their registration and billing/rate details.
Here, you can view the date the child registered at the center and the program they are currently in.

You can also see the billing amount and date, as well as the rate they are billed.
These details automatically update if the child changes programs or rates (for example, moving from an infant program/rate to a toddler program/rate).
Note that a card in this column does not mean the family has been billed, it simply displays the information of all children for that period that are actively registered and what they "should' be billed. Once the family has actually been billed, the second column will populate with their total family billing breakdown.
Step 3: Understand the Billings Column
The second column, Billings, provides a breakdown of billing details.
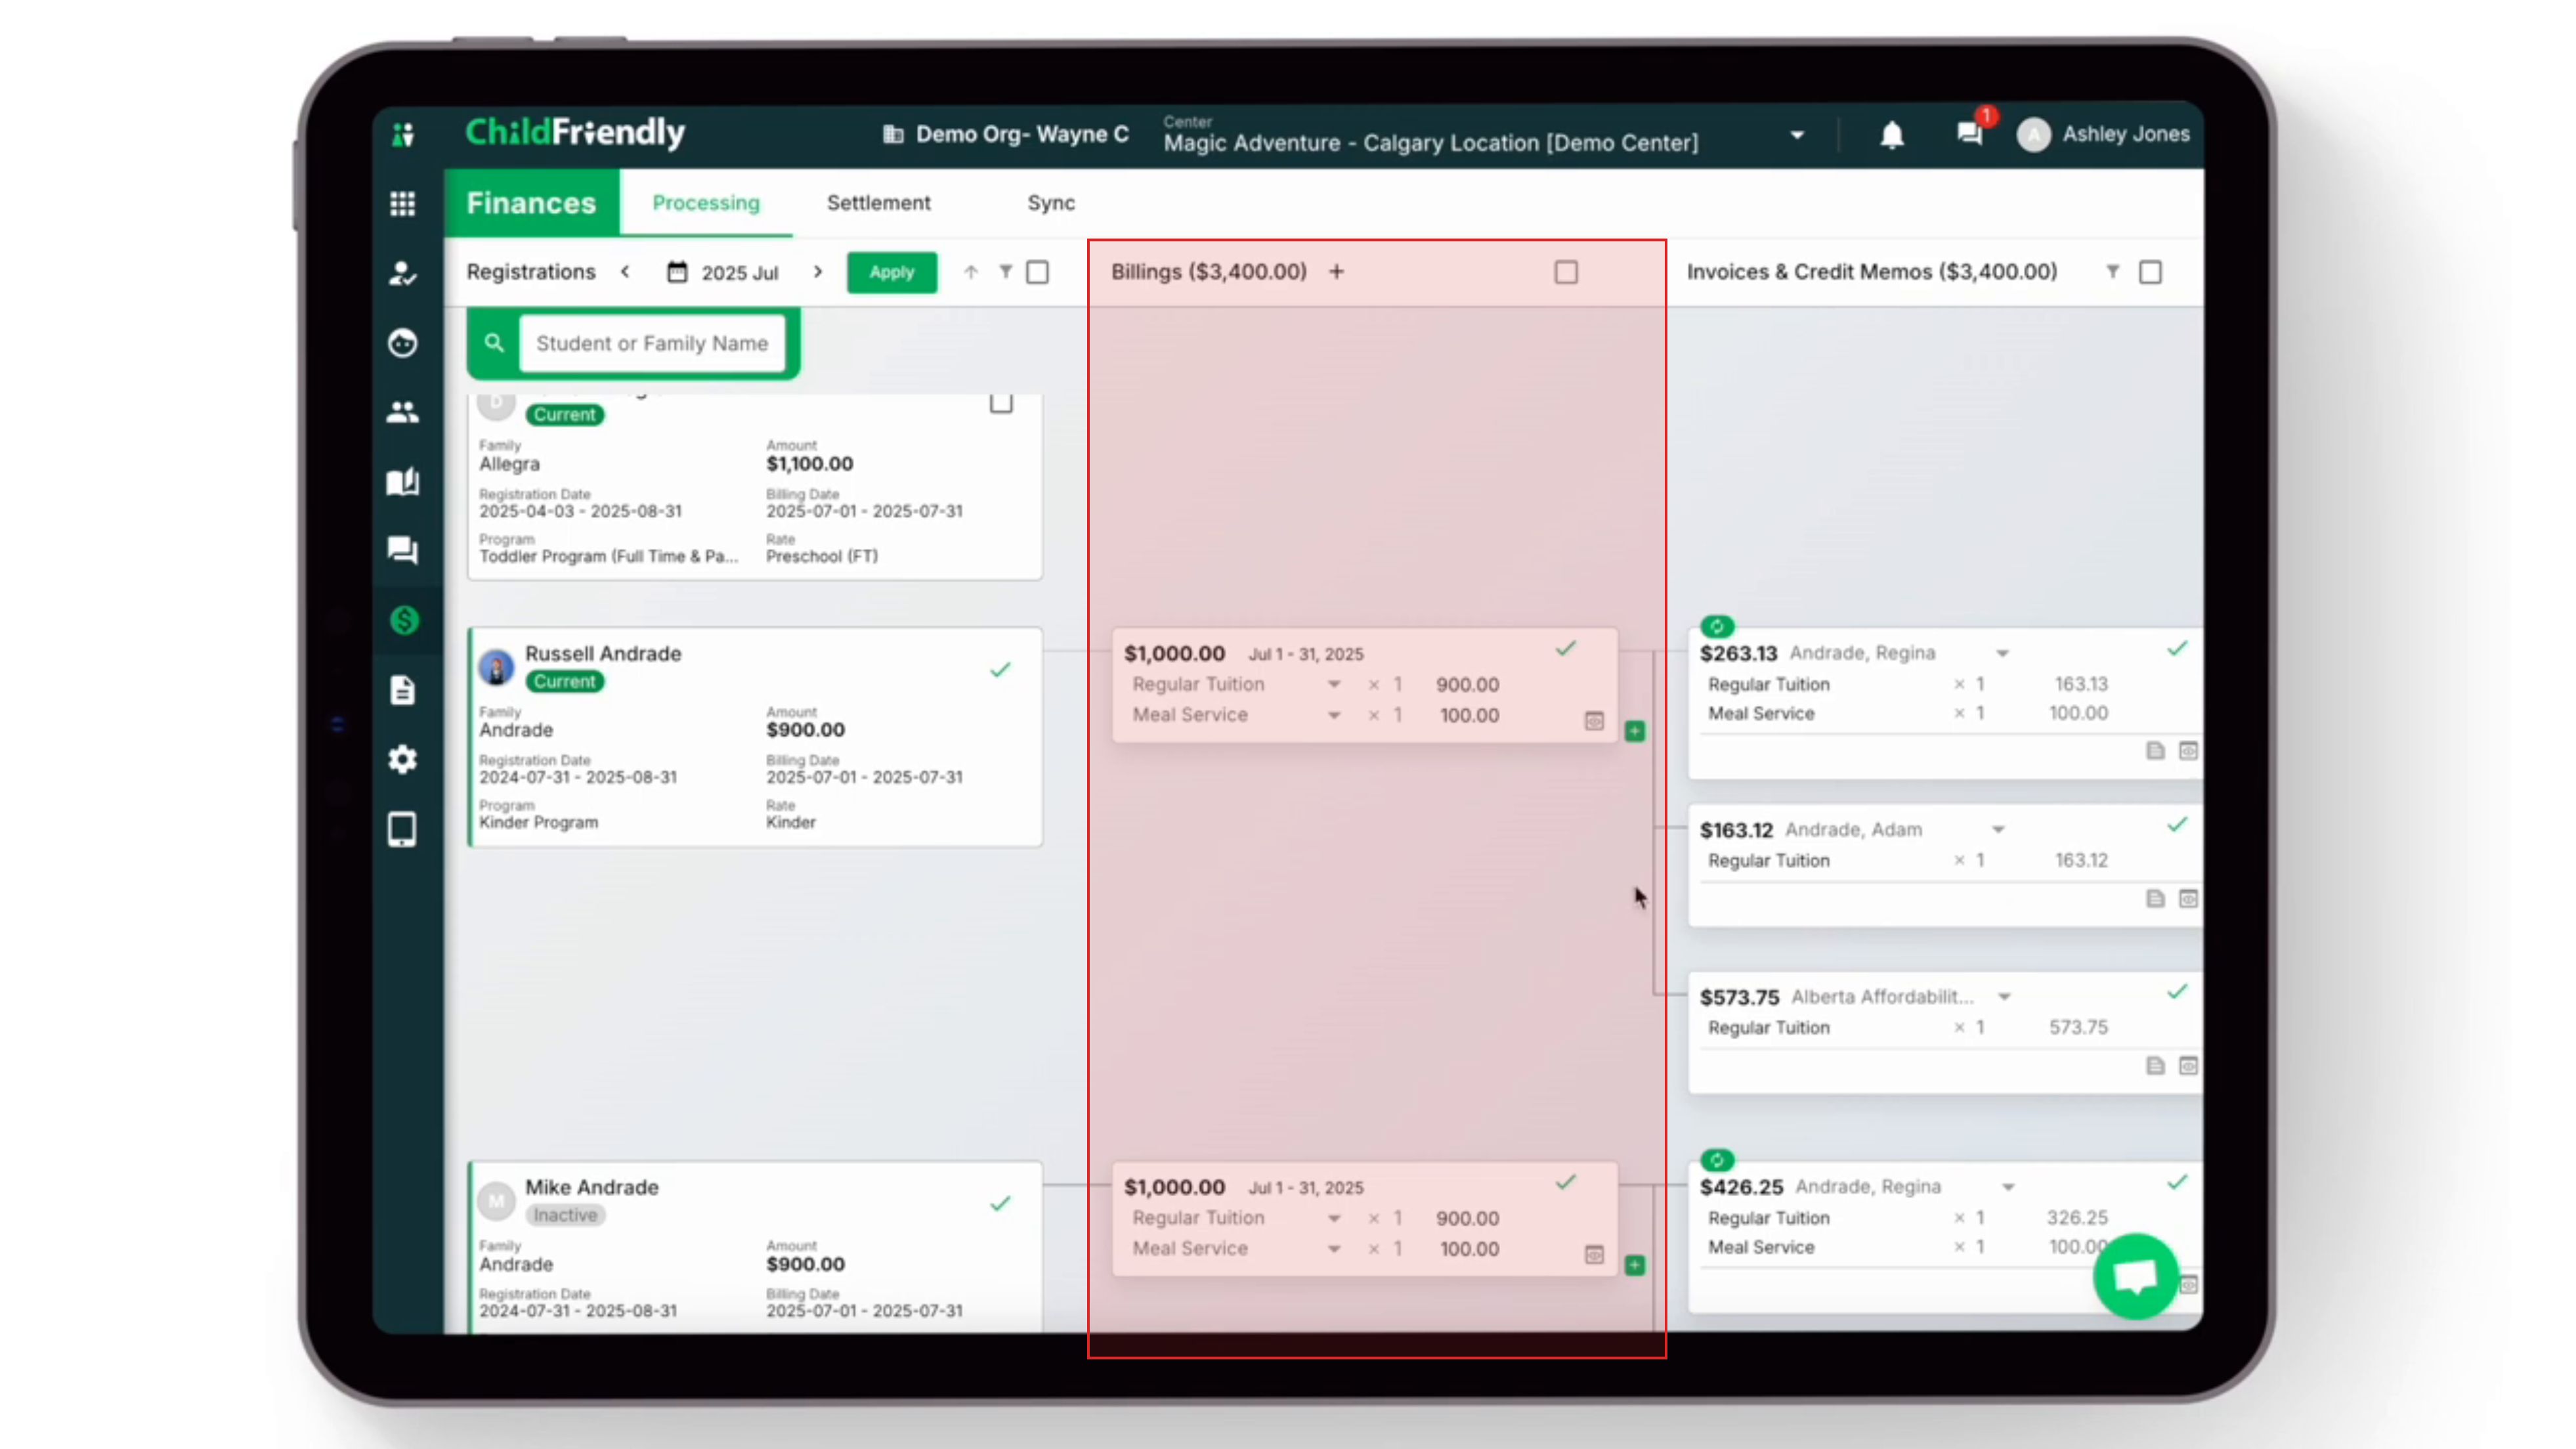
In this example, there is a tuition amount of $900.

If there are any discounts or supplemental fees (such as a meal service or employee discount), they will also be listed here. In this example, there is a supplemental fee for a meal service of $100.
Step 4: Review Invoices, Credit Memos, and Sponsor Allocations
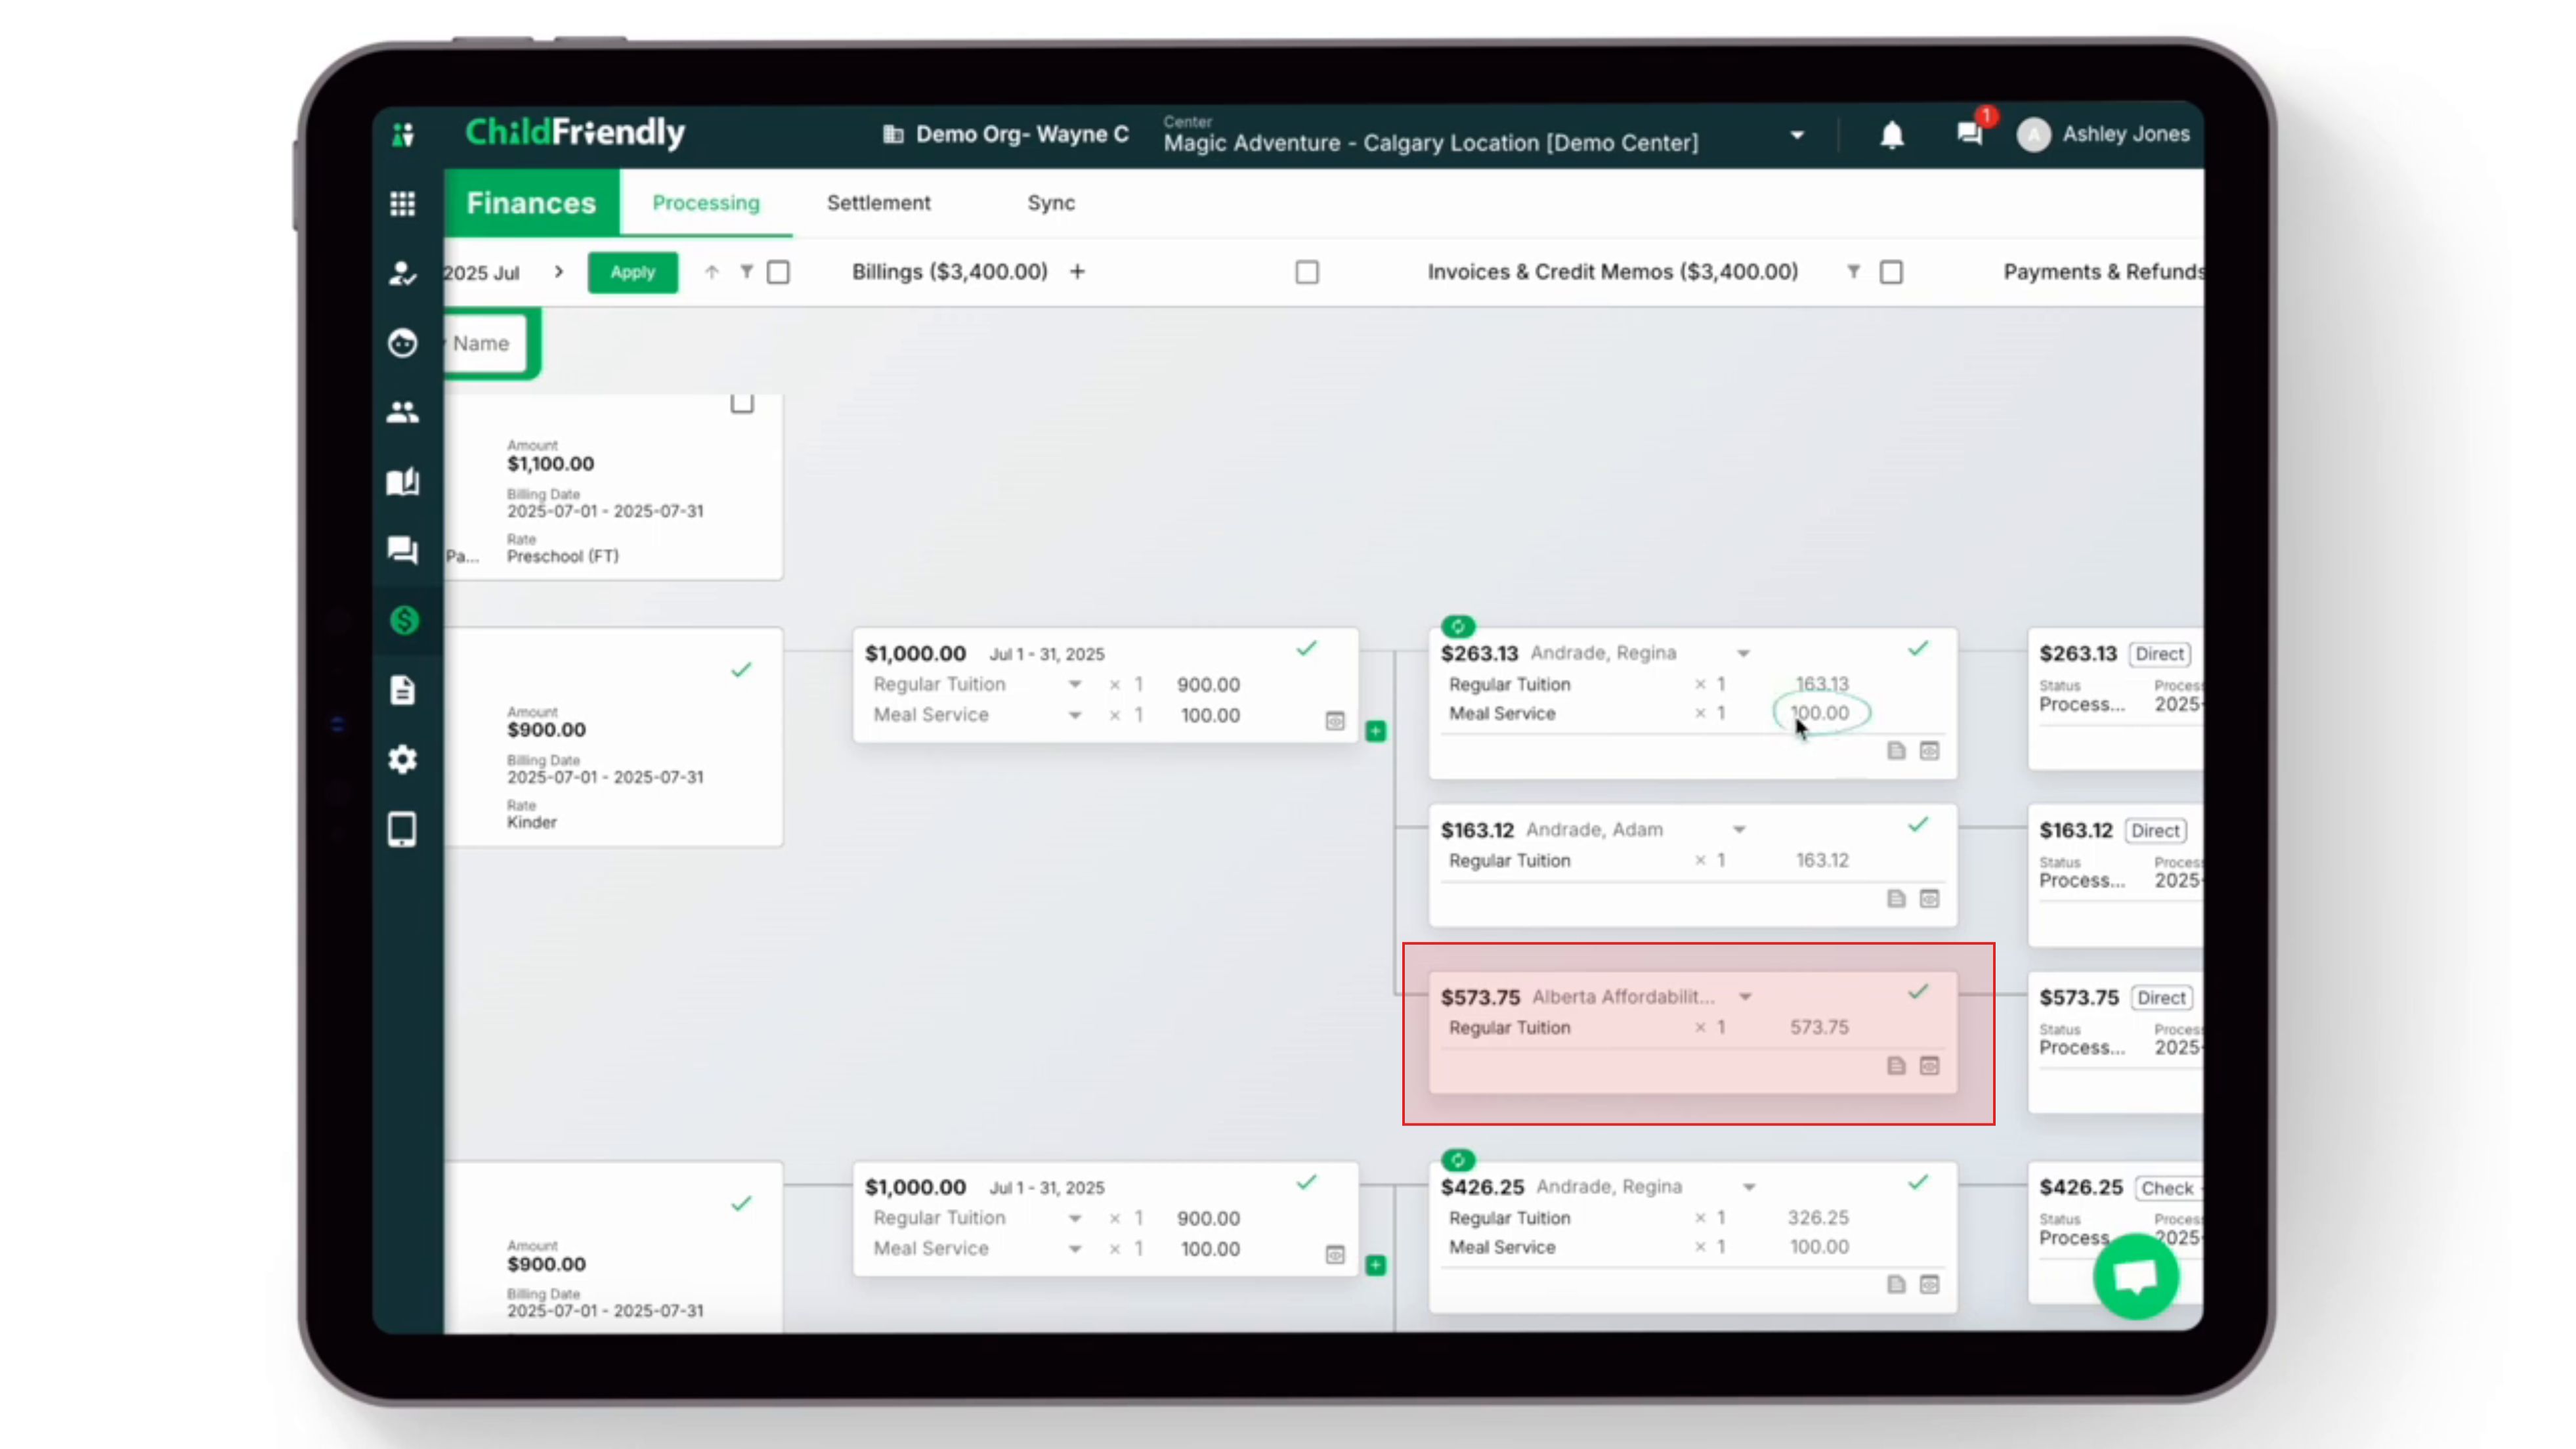
The next column, Invoices and Credit Memos, shows the billing breakdown by invoice or credit memo for each sponsor.
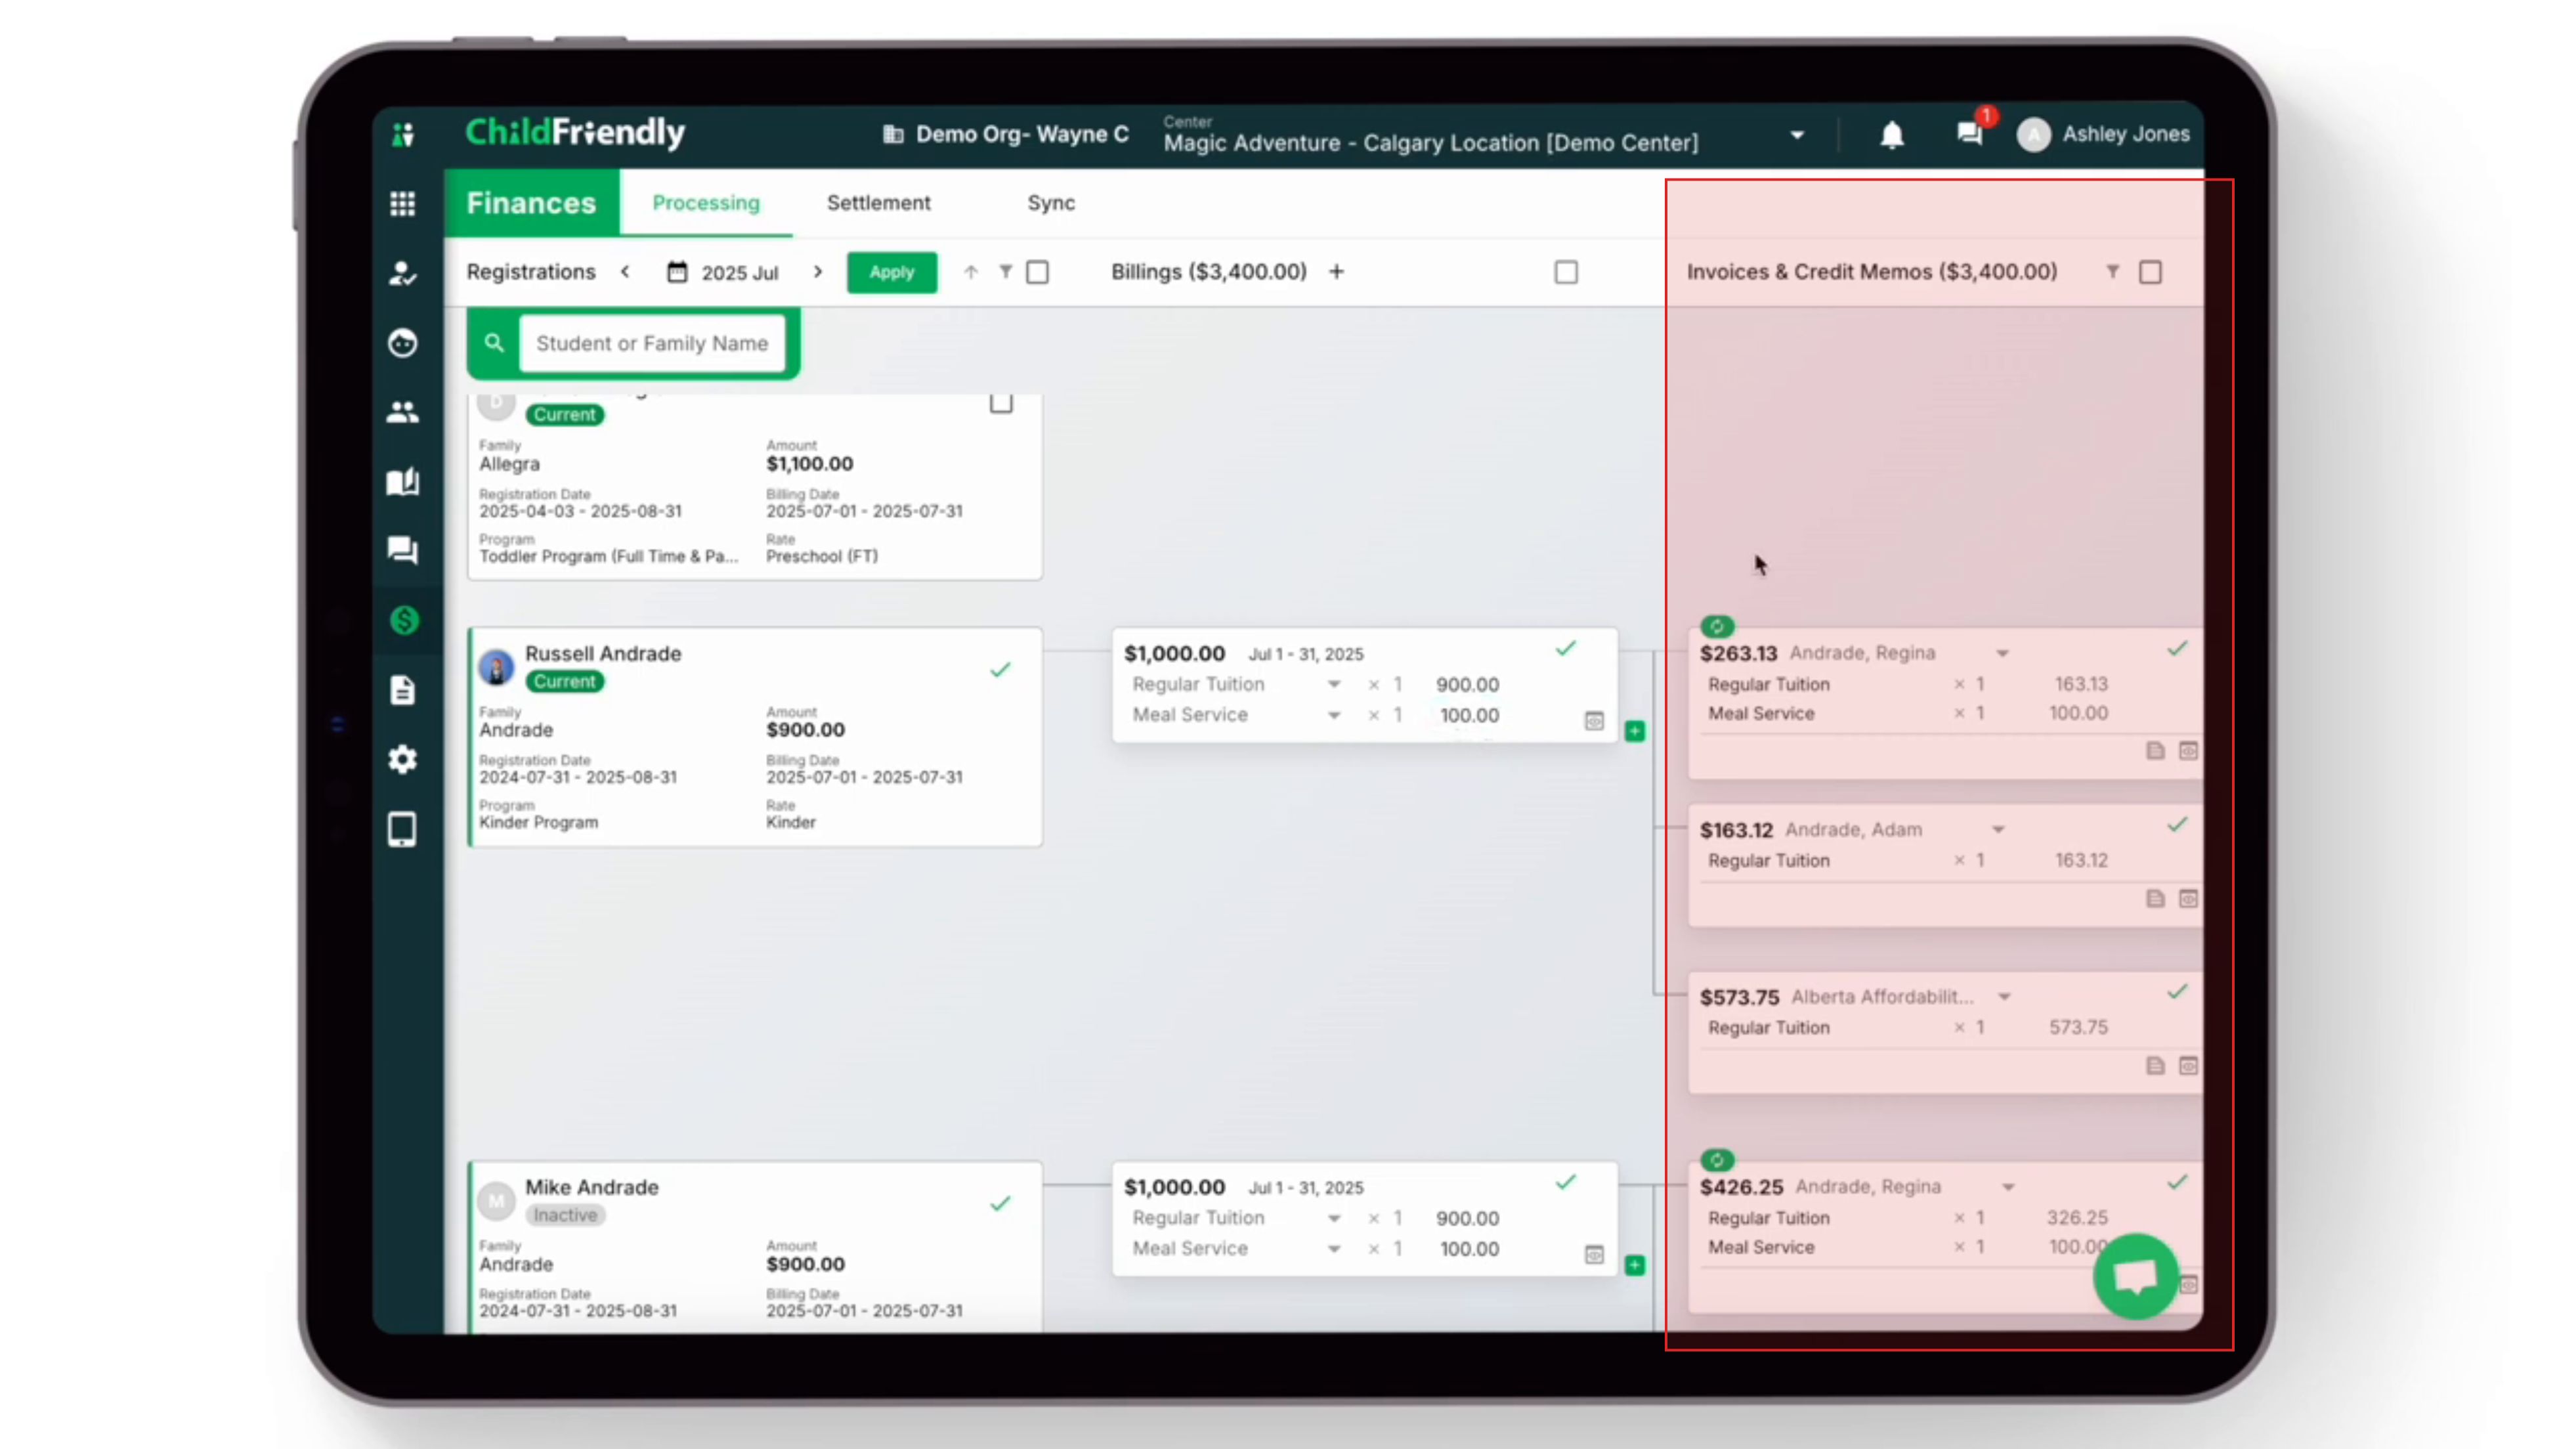
You can see that all invoices add up to the total overall billing amount.
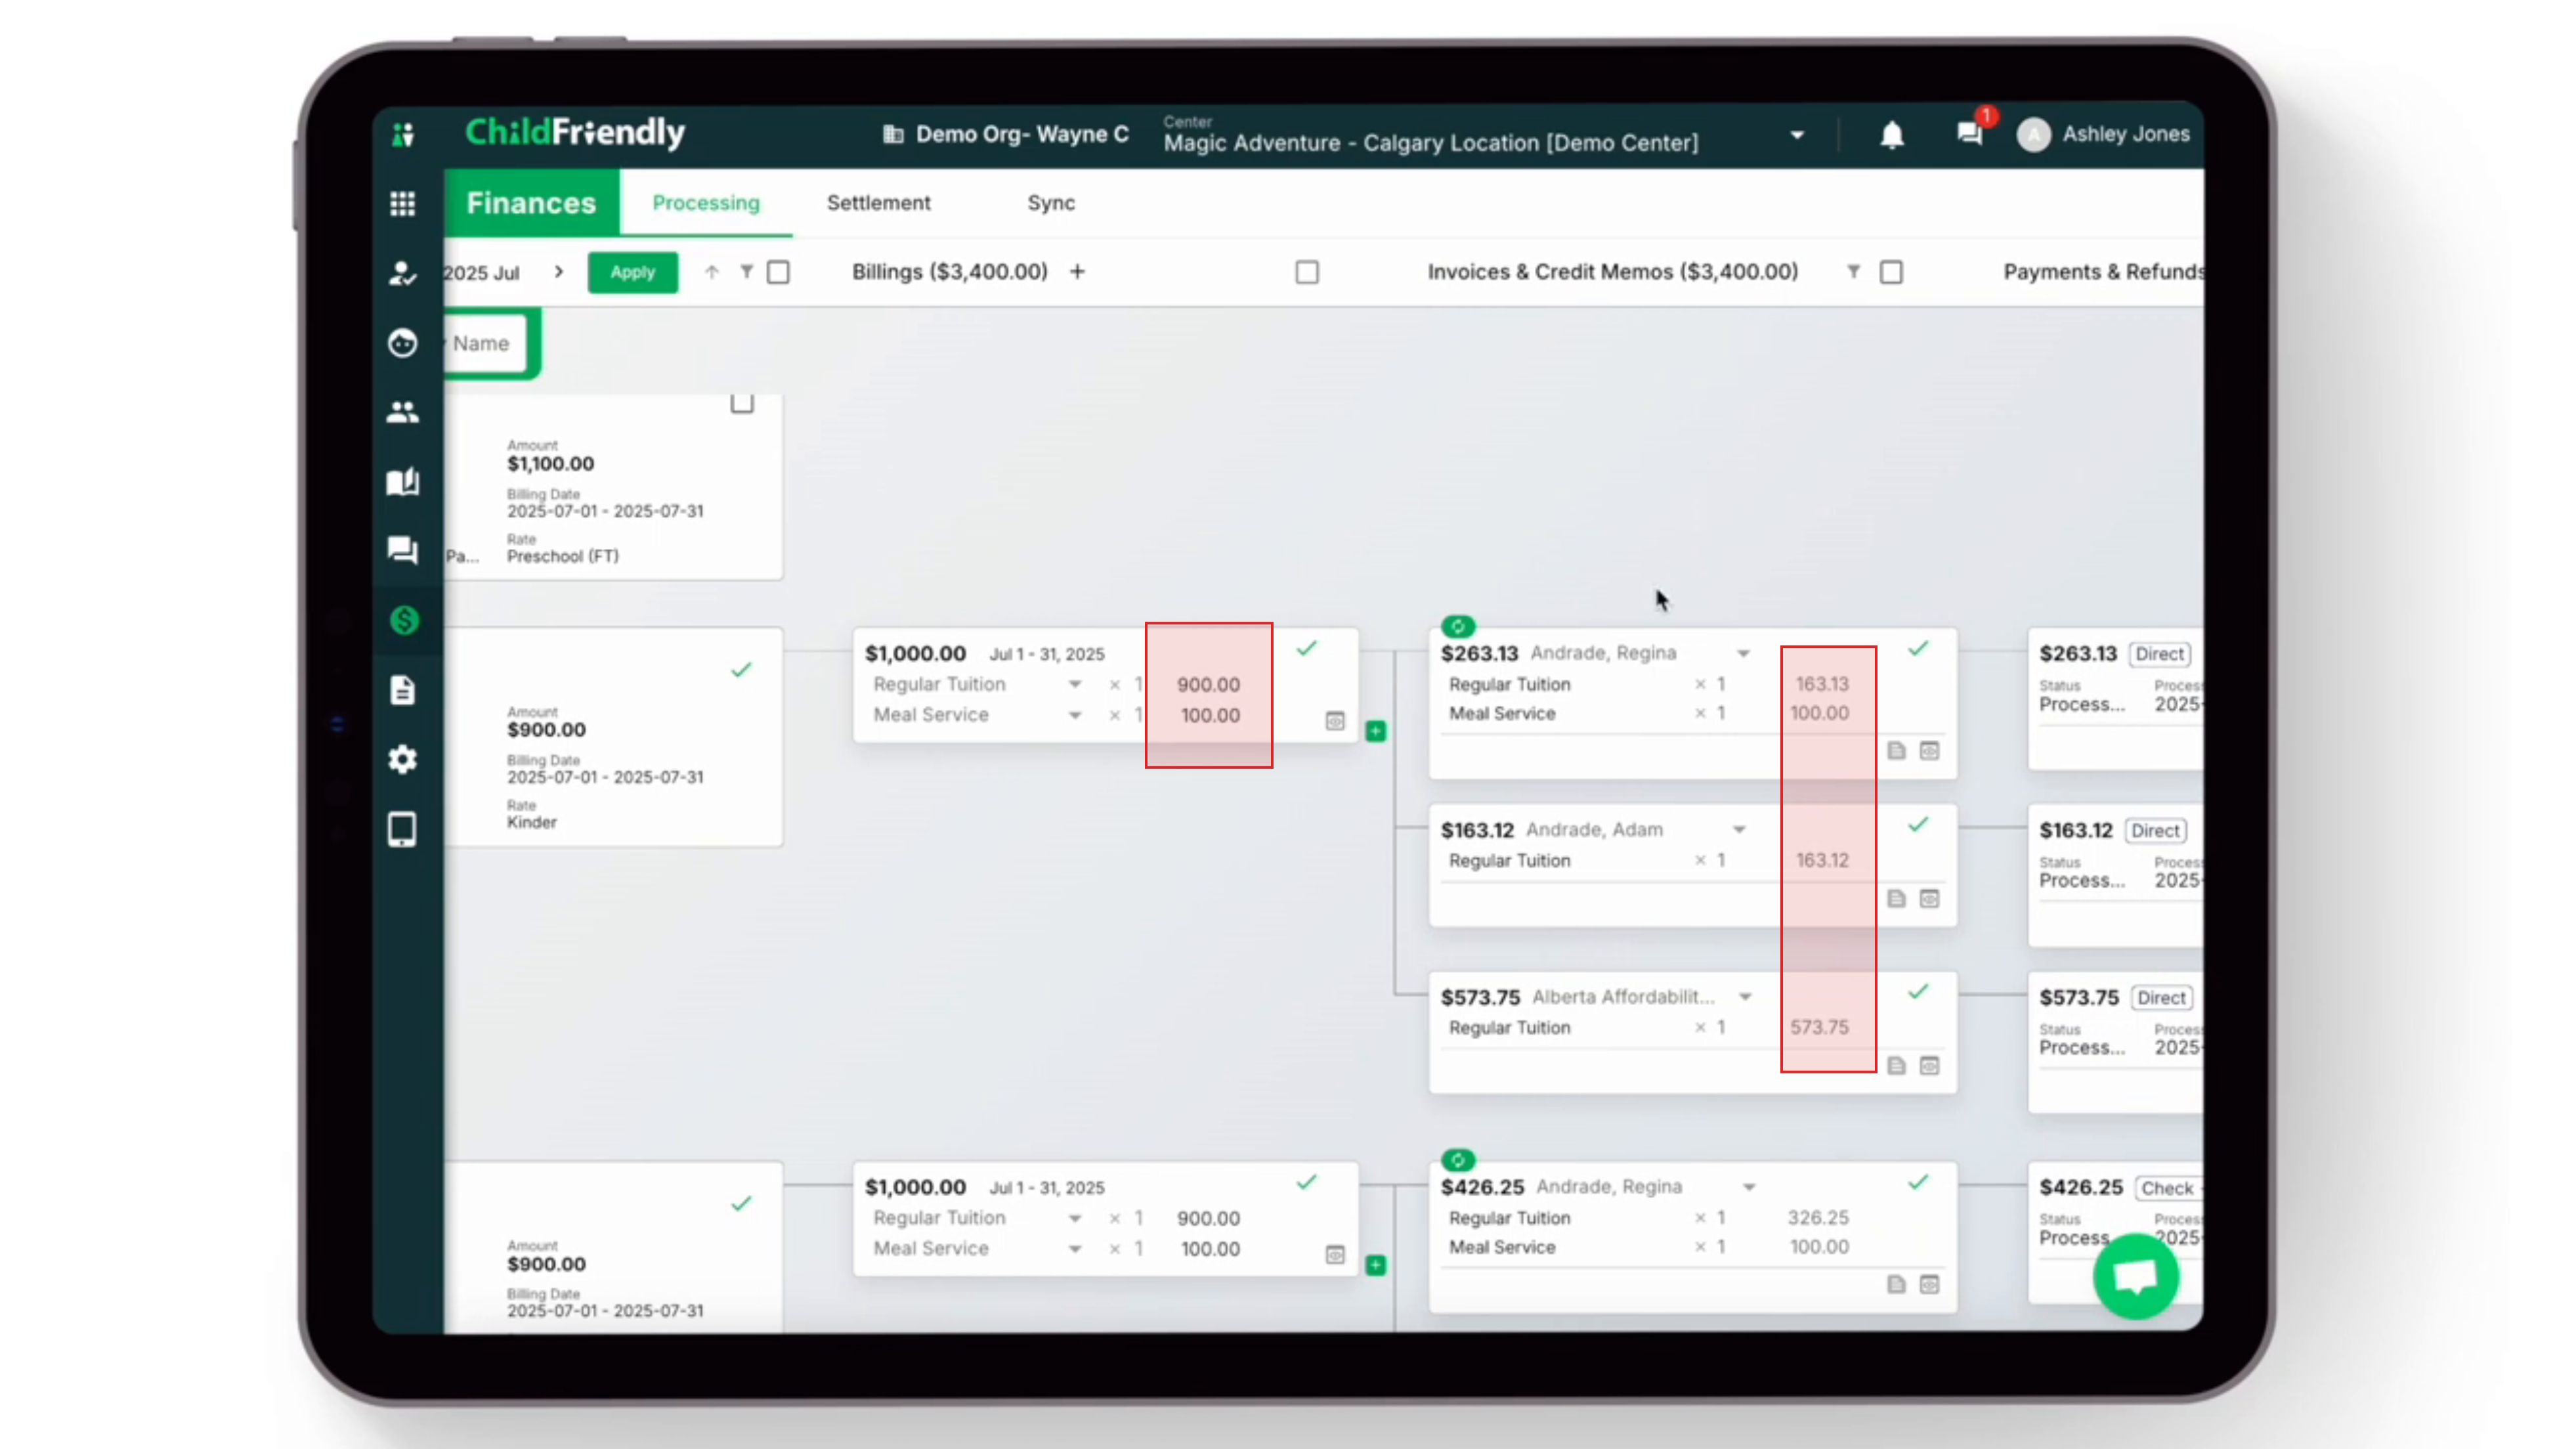
For the example of Russell’s billing, both Regina and Adam are each responsible for 50% of the recurring parent tuition amount of $326.25.
This split can be configured by percentages or dollar amounts in the sponsor ledger setup. Additionally, Regina is responsible for paying a supplemental fee program of $100, in addition to the recurring tuition billing (in this example, a meal service).
If there are any third-party sponsors, such as grants or subsidies, they will also be included here.
In this case, the Alberta Affordability Grant covers the remaining portion of the recurring tuition: $900 total tuition minus the personal sponsor portion of $326.25, resulting in an allocation of $573.75 to the Affordability Grant.
Step 5: View Payments, Refunds, and Add Memos
The following column shows any payments or refunds applied to what you billed.
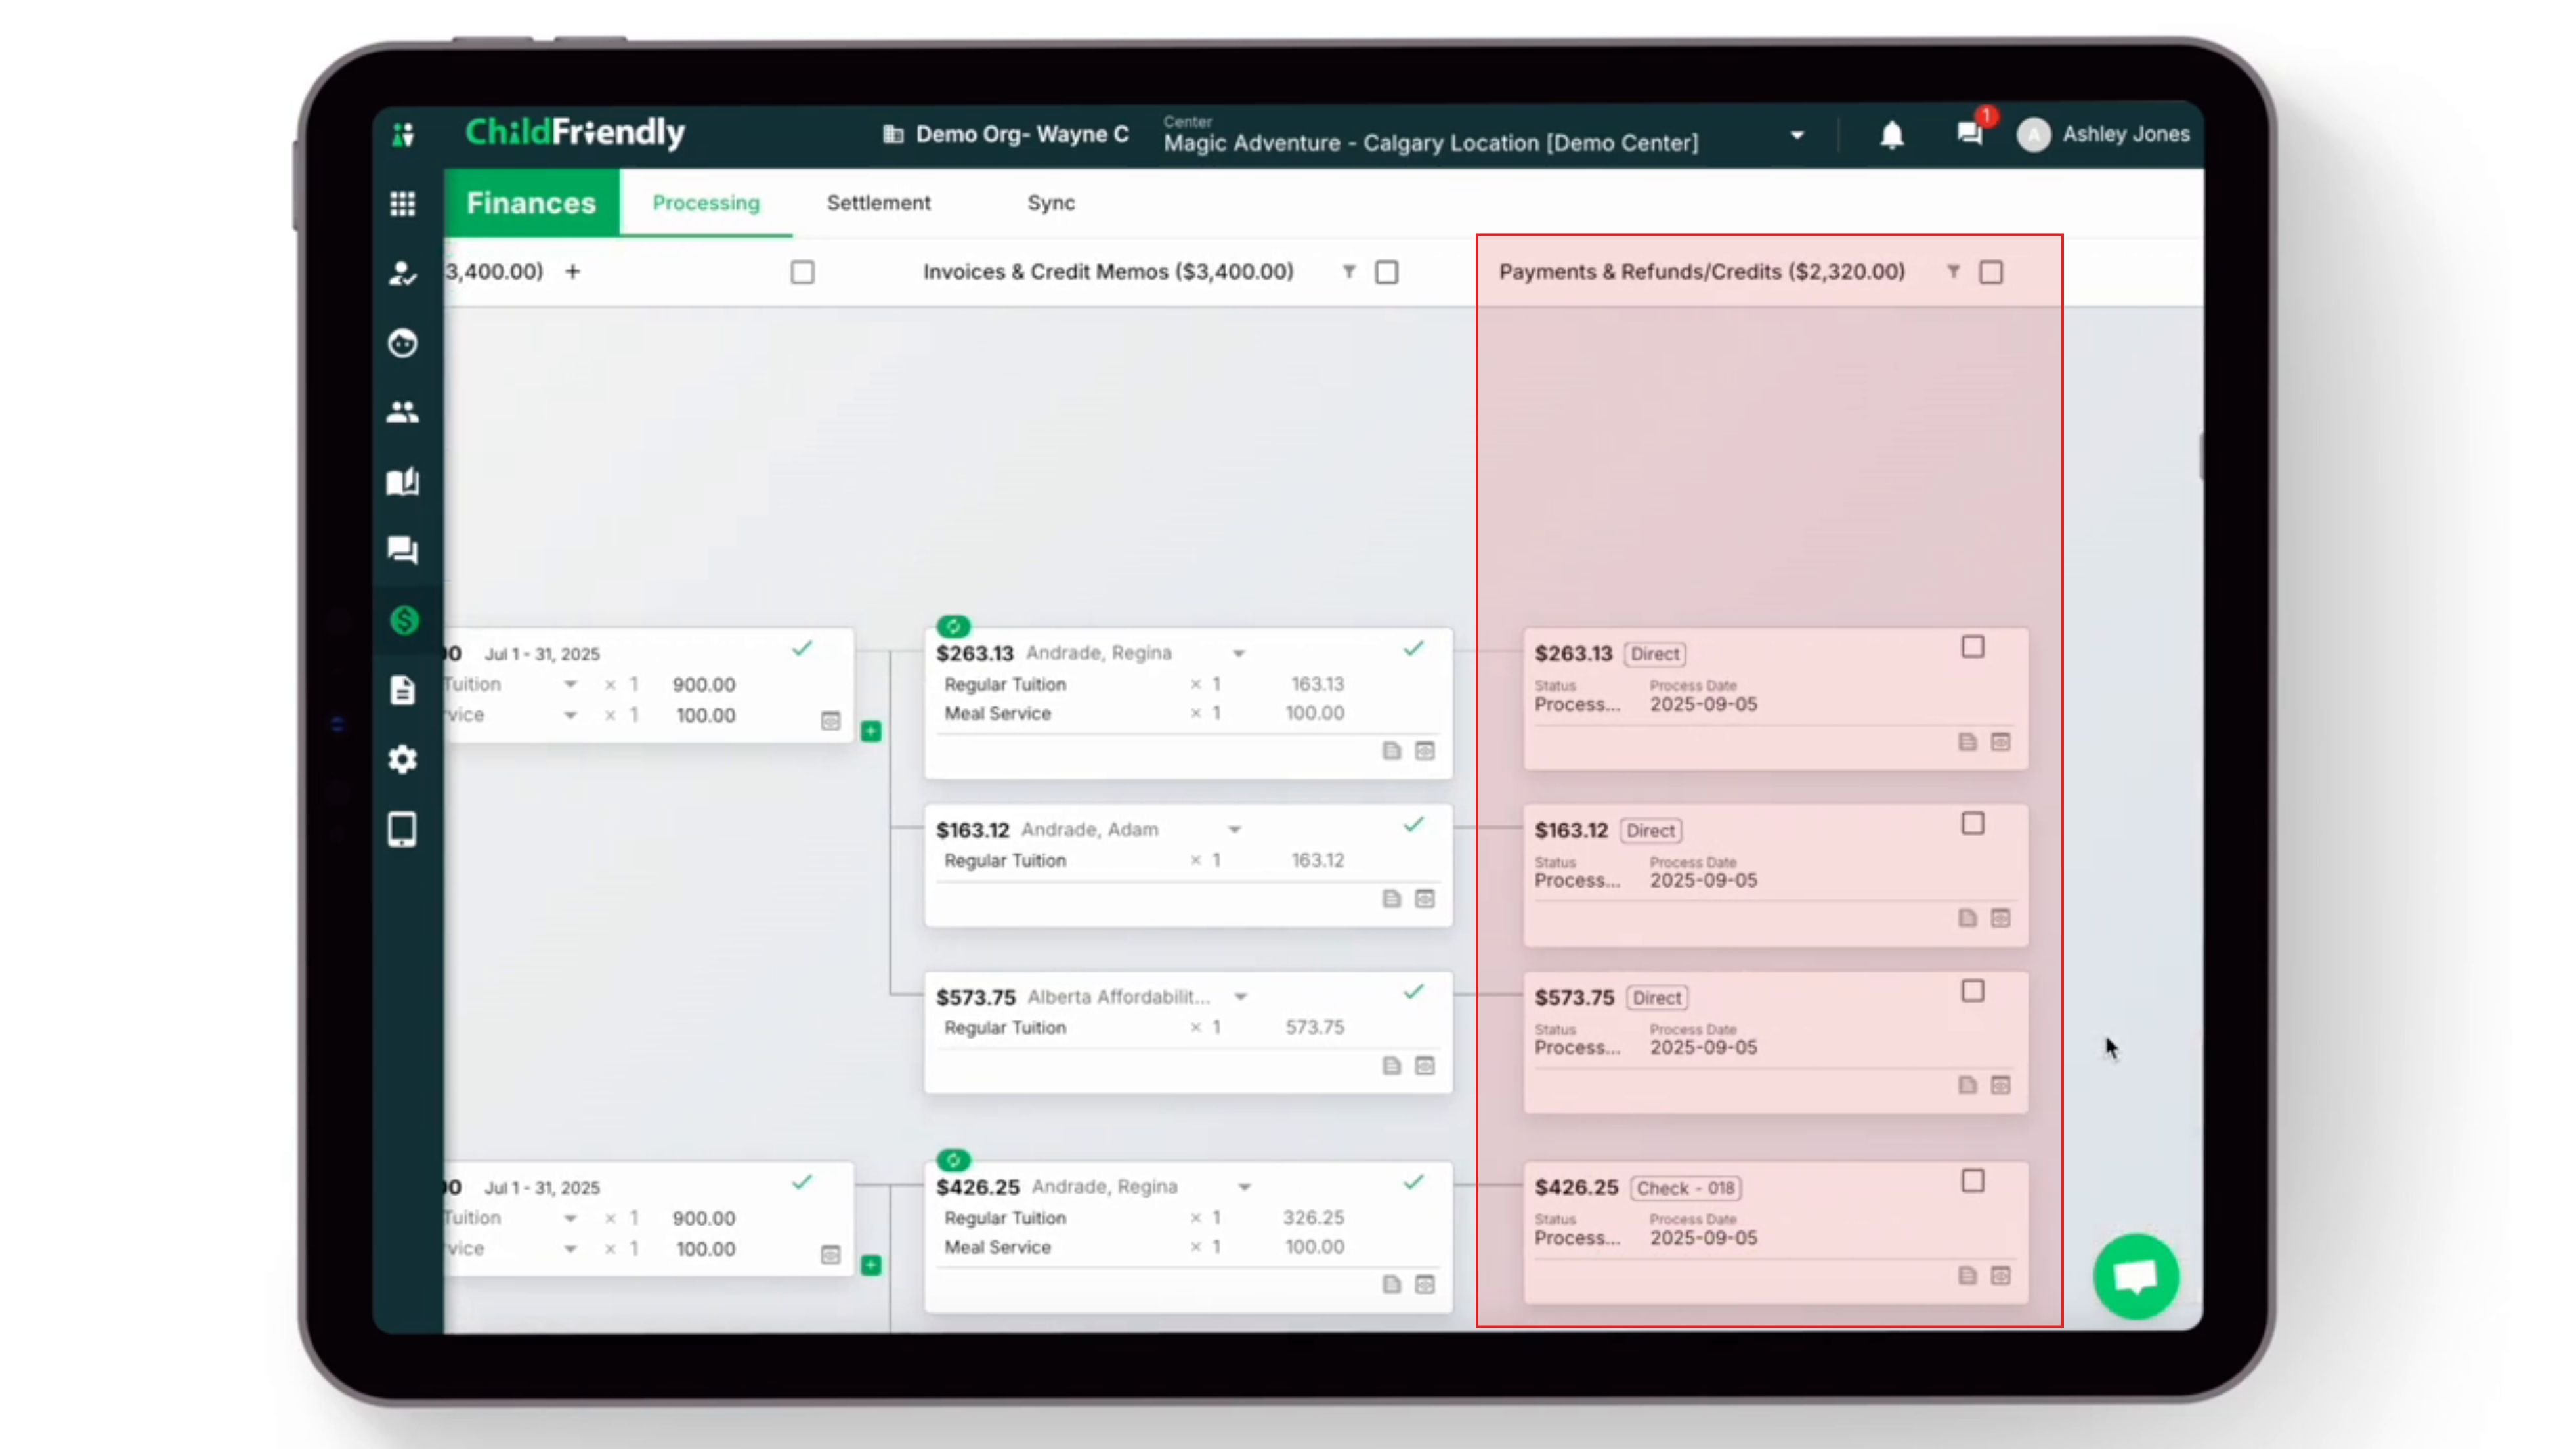
Here, you can review and record payments that have been made by parents and third parties. If you process PAD, Credit Card or ACH payments, the system automatically generates these payments and provides their status.
To add a memo to an invoice, click the Add Memo option.
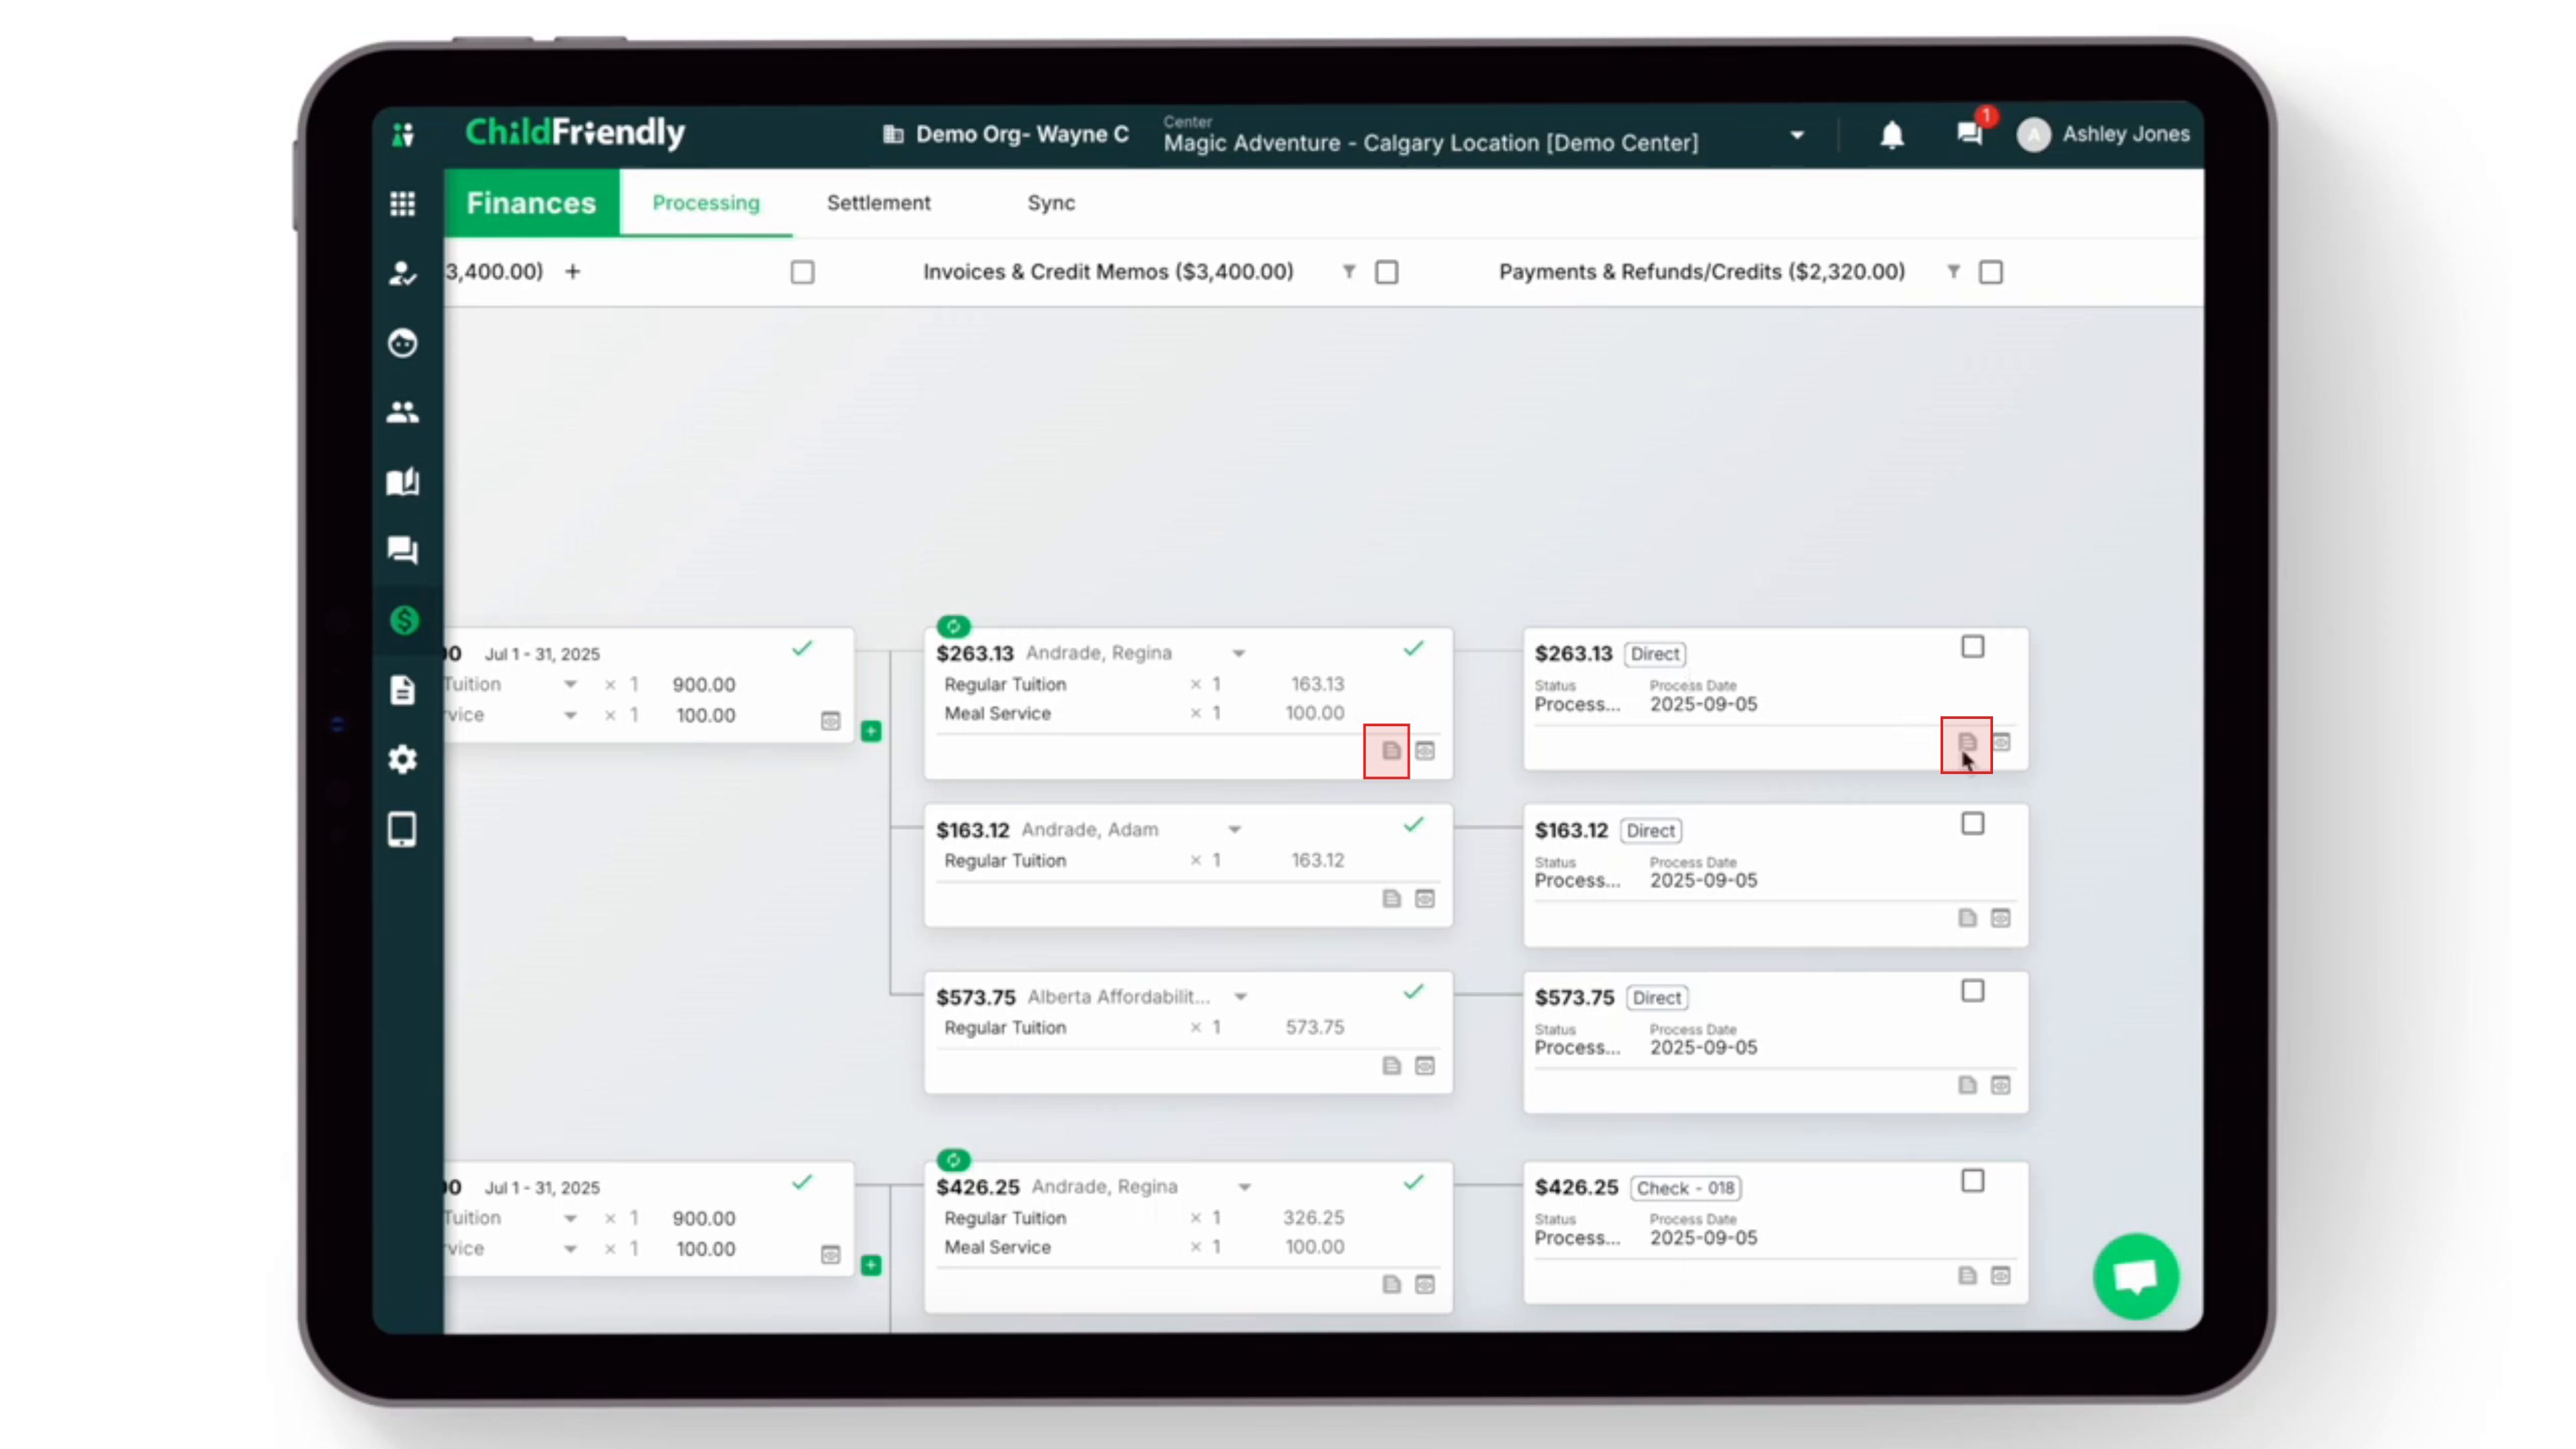
You can also preview the statement to ensure all sponsors are correctly captured for this month’s billing.
The preview shows the billing number, billing period, billing total, tuition cost, any applicable credits, and the outstanding total. The statement provides the full billing breakdown for all sponsors.
Once a billing is generated, invoices automatically are generated in the parent app.
Step 6: Email Statements to Sponsors
Although, automatically available via the parent app, if a parent still wants an email copy of the invoice or statement, that option is available on this screen.
Select any of the sponsors and then click Email PDF.

This sends the statement or invoice as a PDF to the selected sponsor.
Step 7: Filter and View Billings by Month or Date Range
To view invoices for all students for a particular month, select the month from the calendar option.

Next, click the Apply button.

You can now see all billings, invoices, and payments for all children for the selected month.
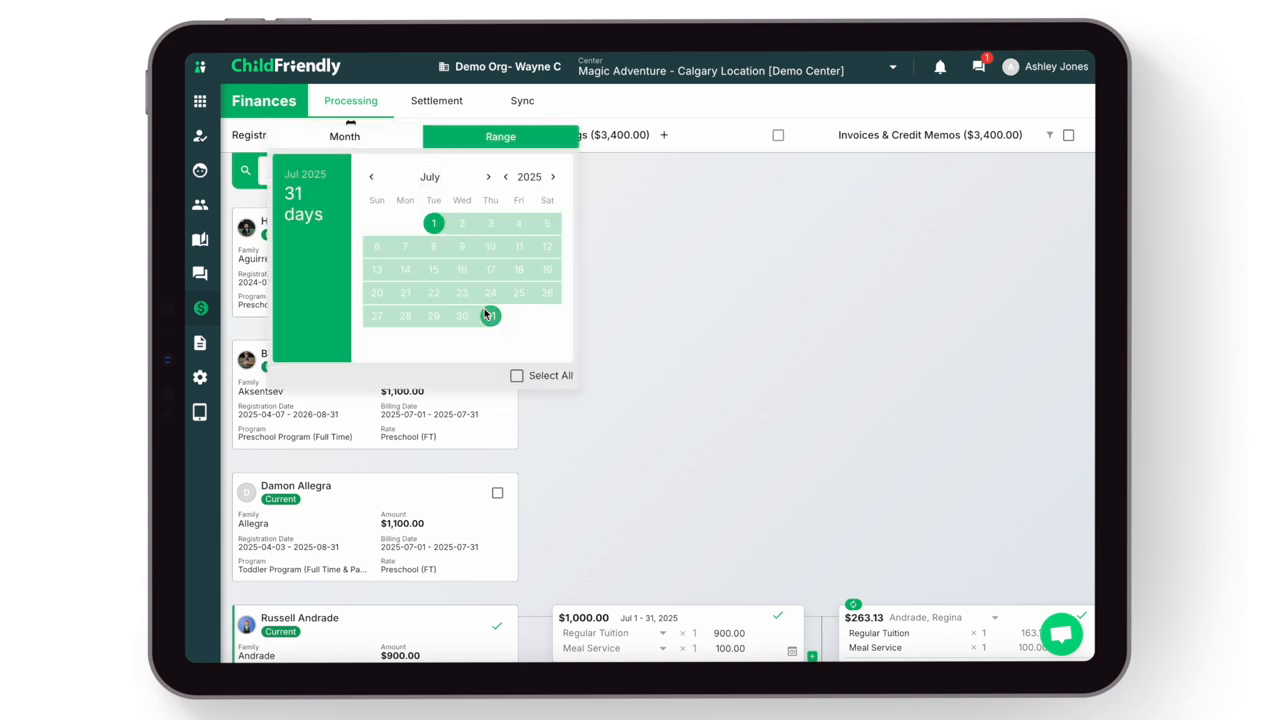
Alternatively, you can search by a specific date range. Open the calendar and click the Range option at the top.
From here, select the desired date range.
To search for a specific child or family, enter the name in the search bar and then click the Apply button to filter for their billing information.

You will now see only the billings related to the selected family.
Step 8: Generate Monthly Billings in Bulk
Each month, you will return to the Finance module to generate billings, typically in bulk (unless you are creating a single billing for a specific family).
In the Finance module, select the month for which you wish to create invoices, then click the Apply button.

Select the checkbox to the left of Billings.
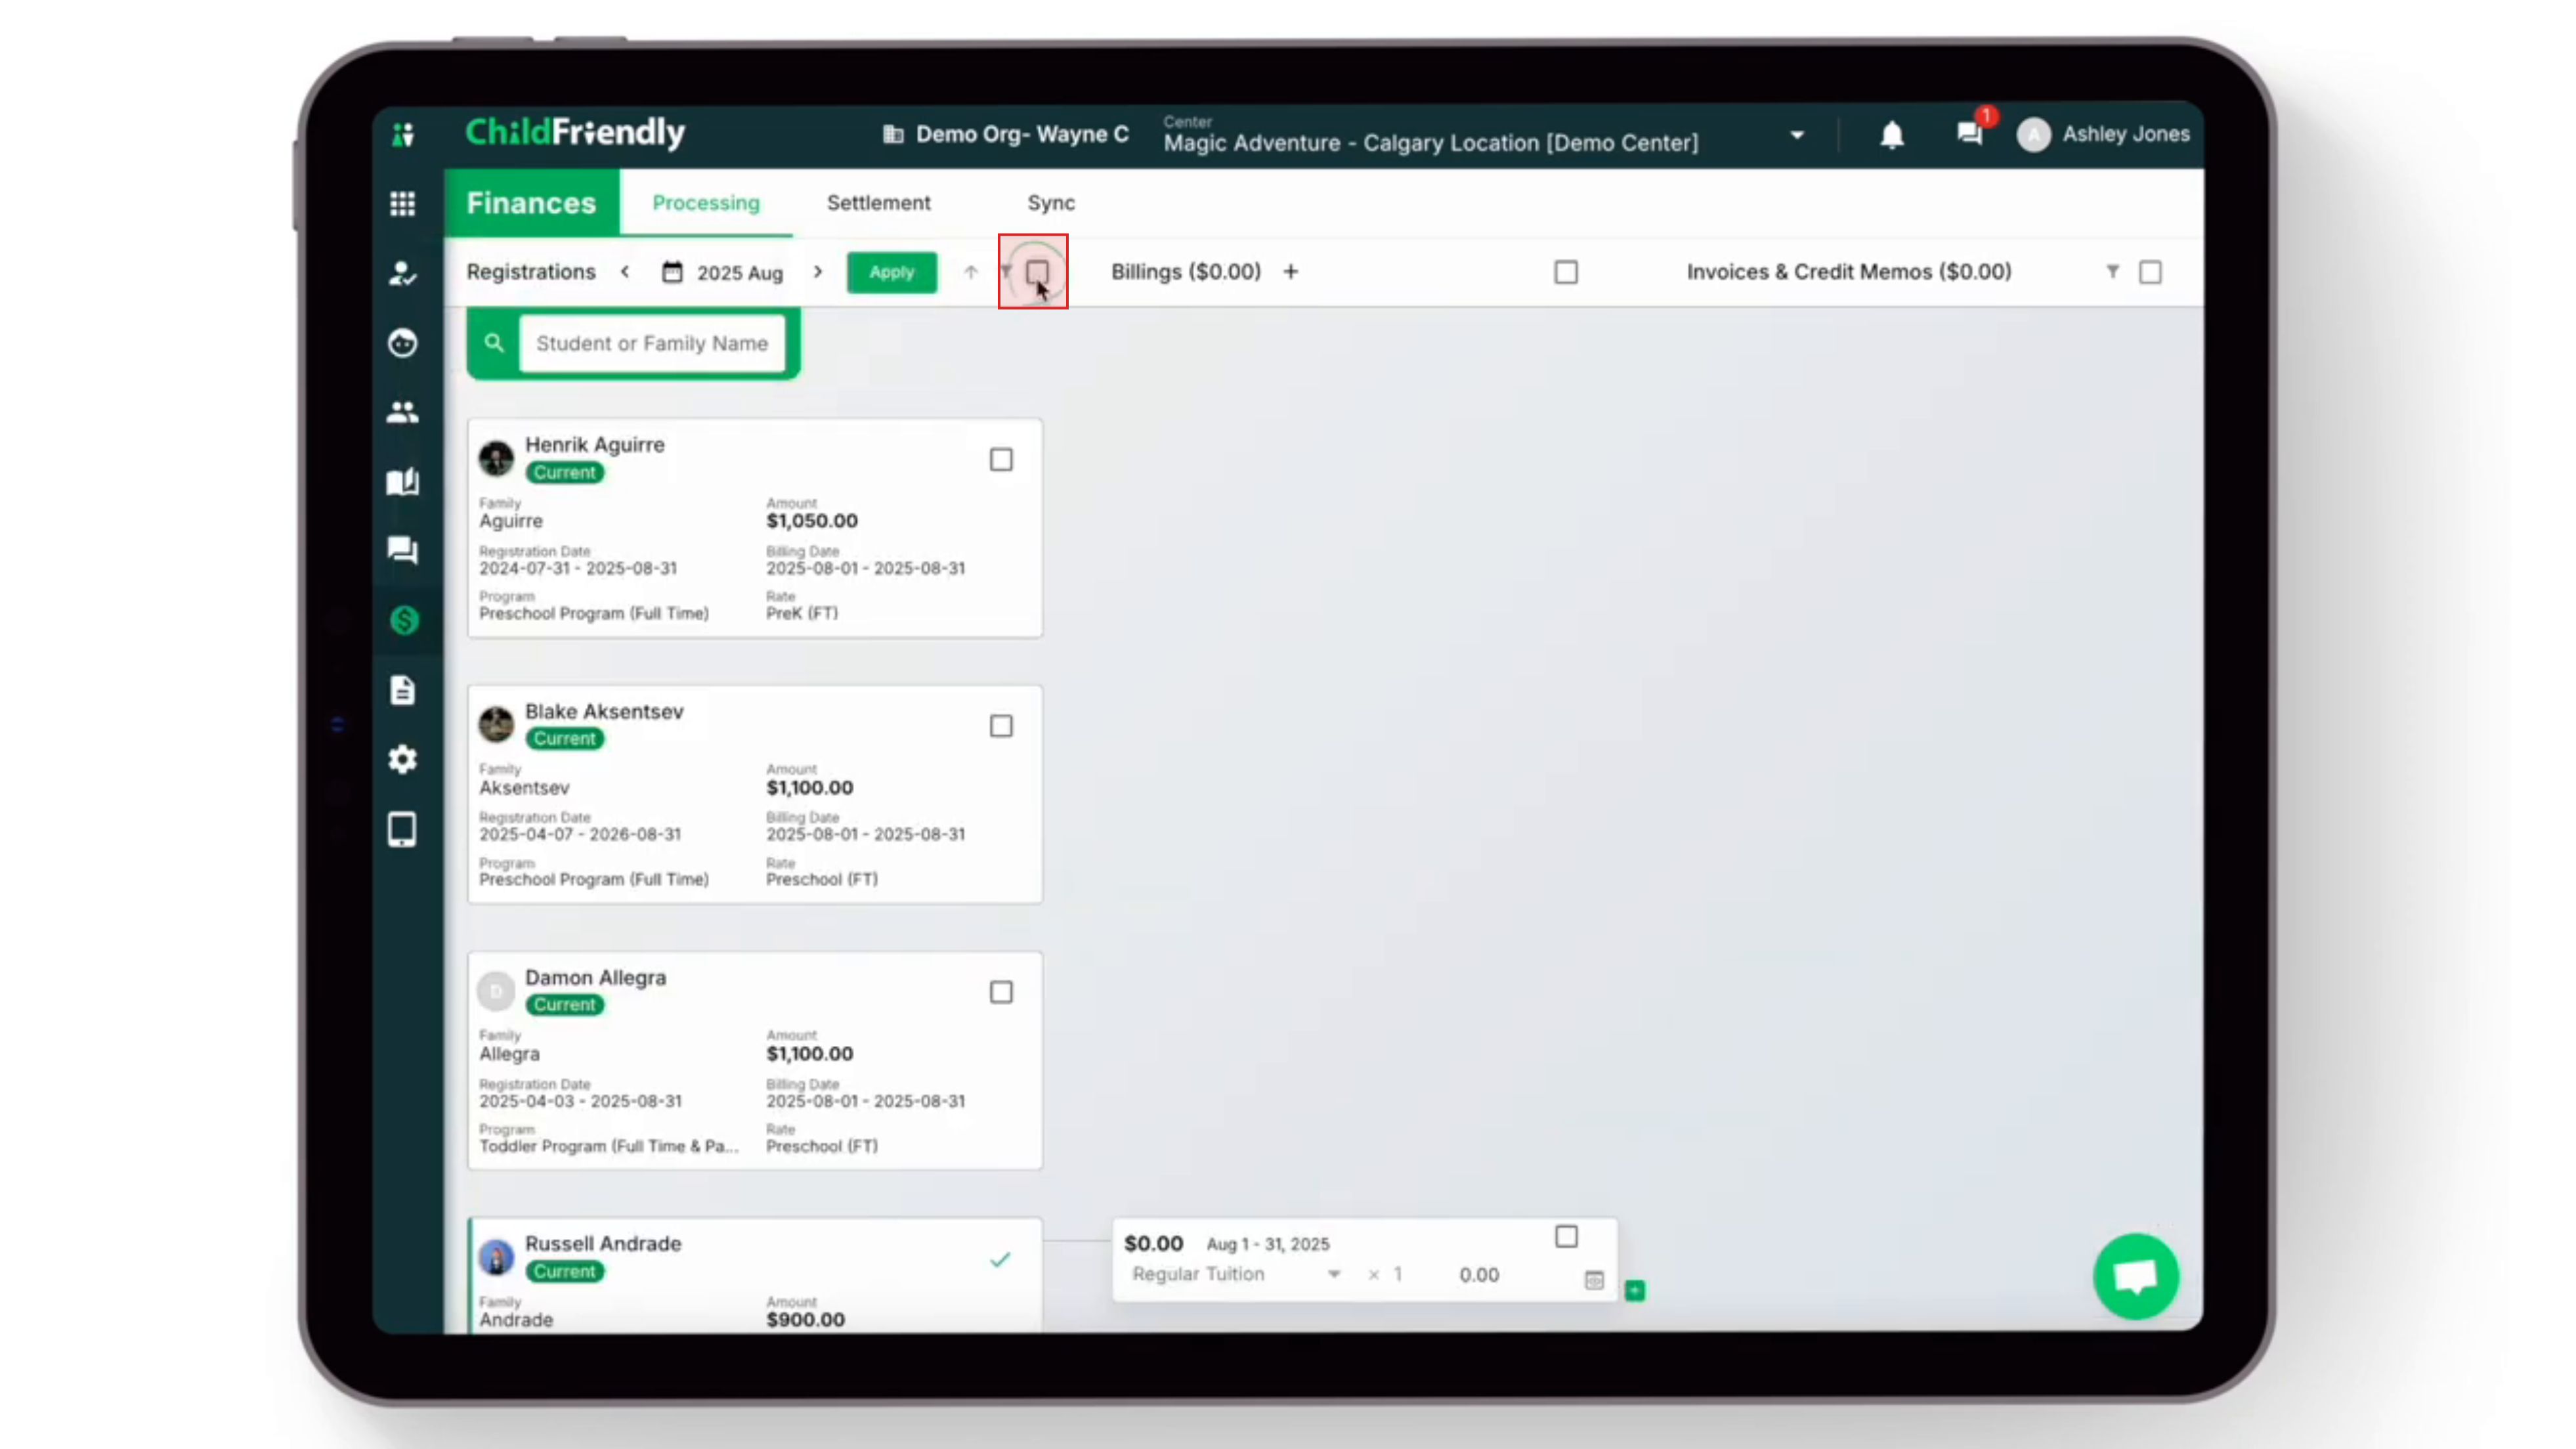
From the dropdown arrow, you have two options: Generate billing with credits and Generate billing without credits.

Generating with credits, will apply all available credits or over payments on a families ledger to the respective sponsor's invoice. Once bills are generated, review the breakdown for each family.
At this point, the bulk billing process is complete. Each sponsor will now be able to see a copy of their respective invoice in their portal.
Step 9: Add an Additional Line Item to an Existing Billing
If a billing needs a correction or requires an additional line item (for example, adding an extra fee), you can edit it directly.
First, click the green plus icon in the bottom-right corner of the billing item.
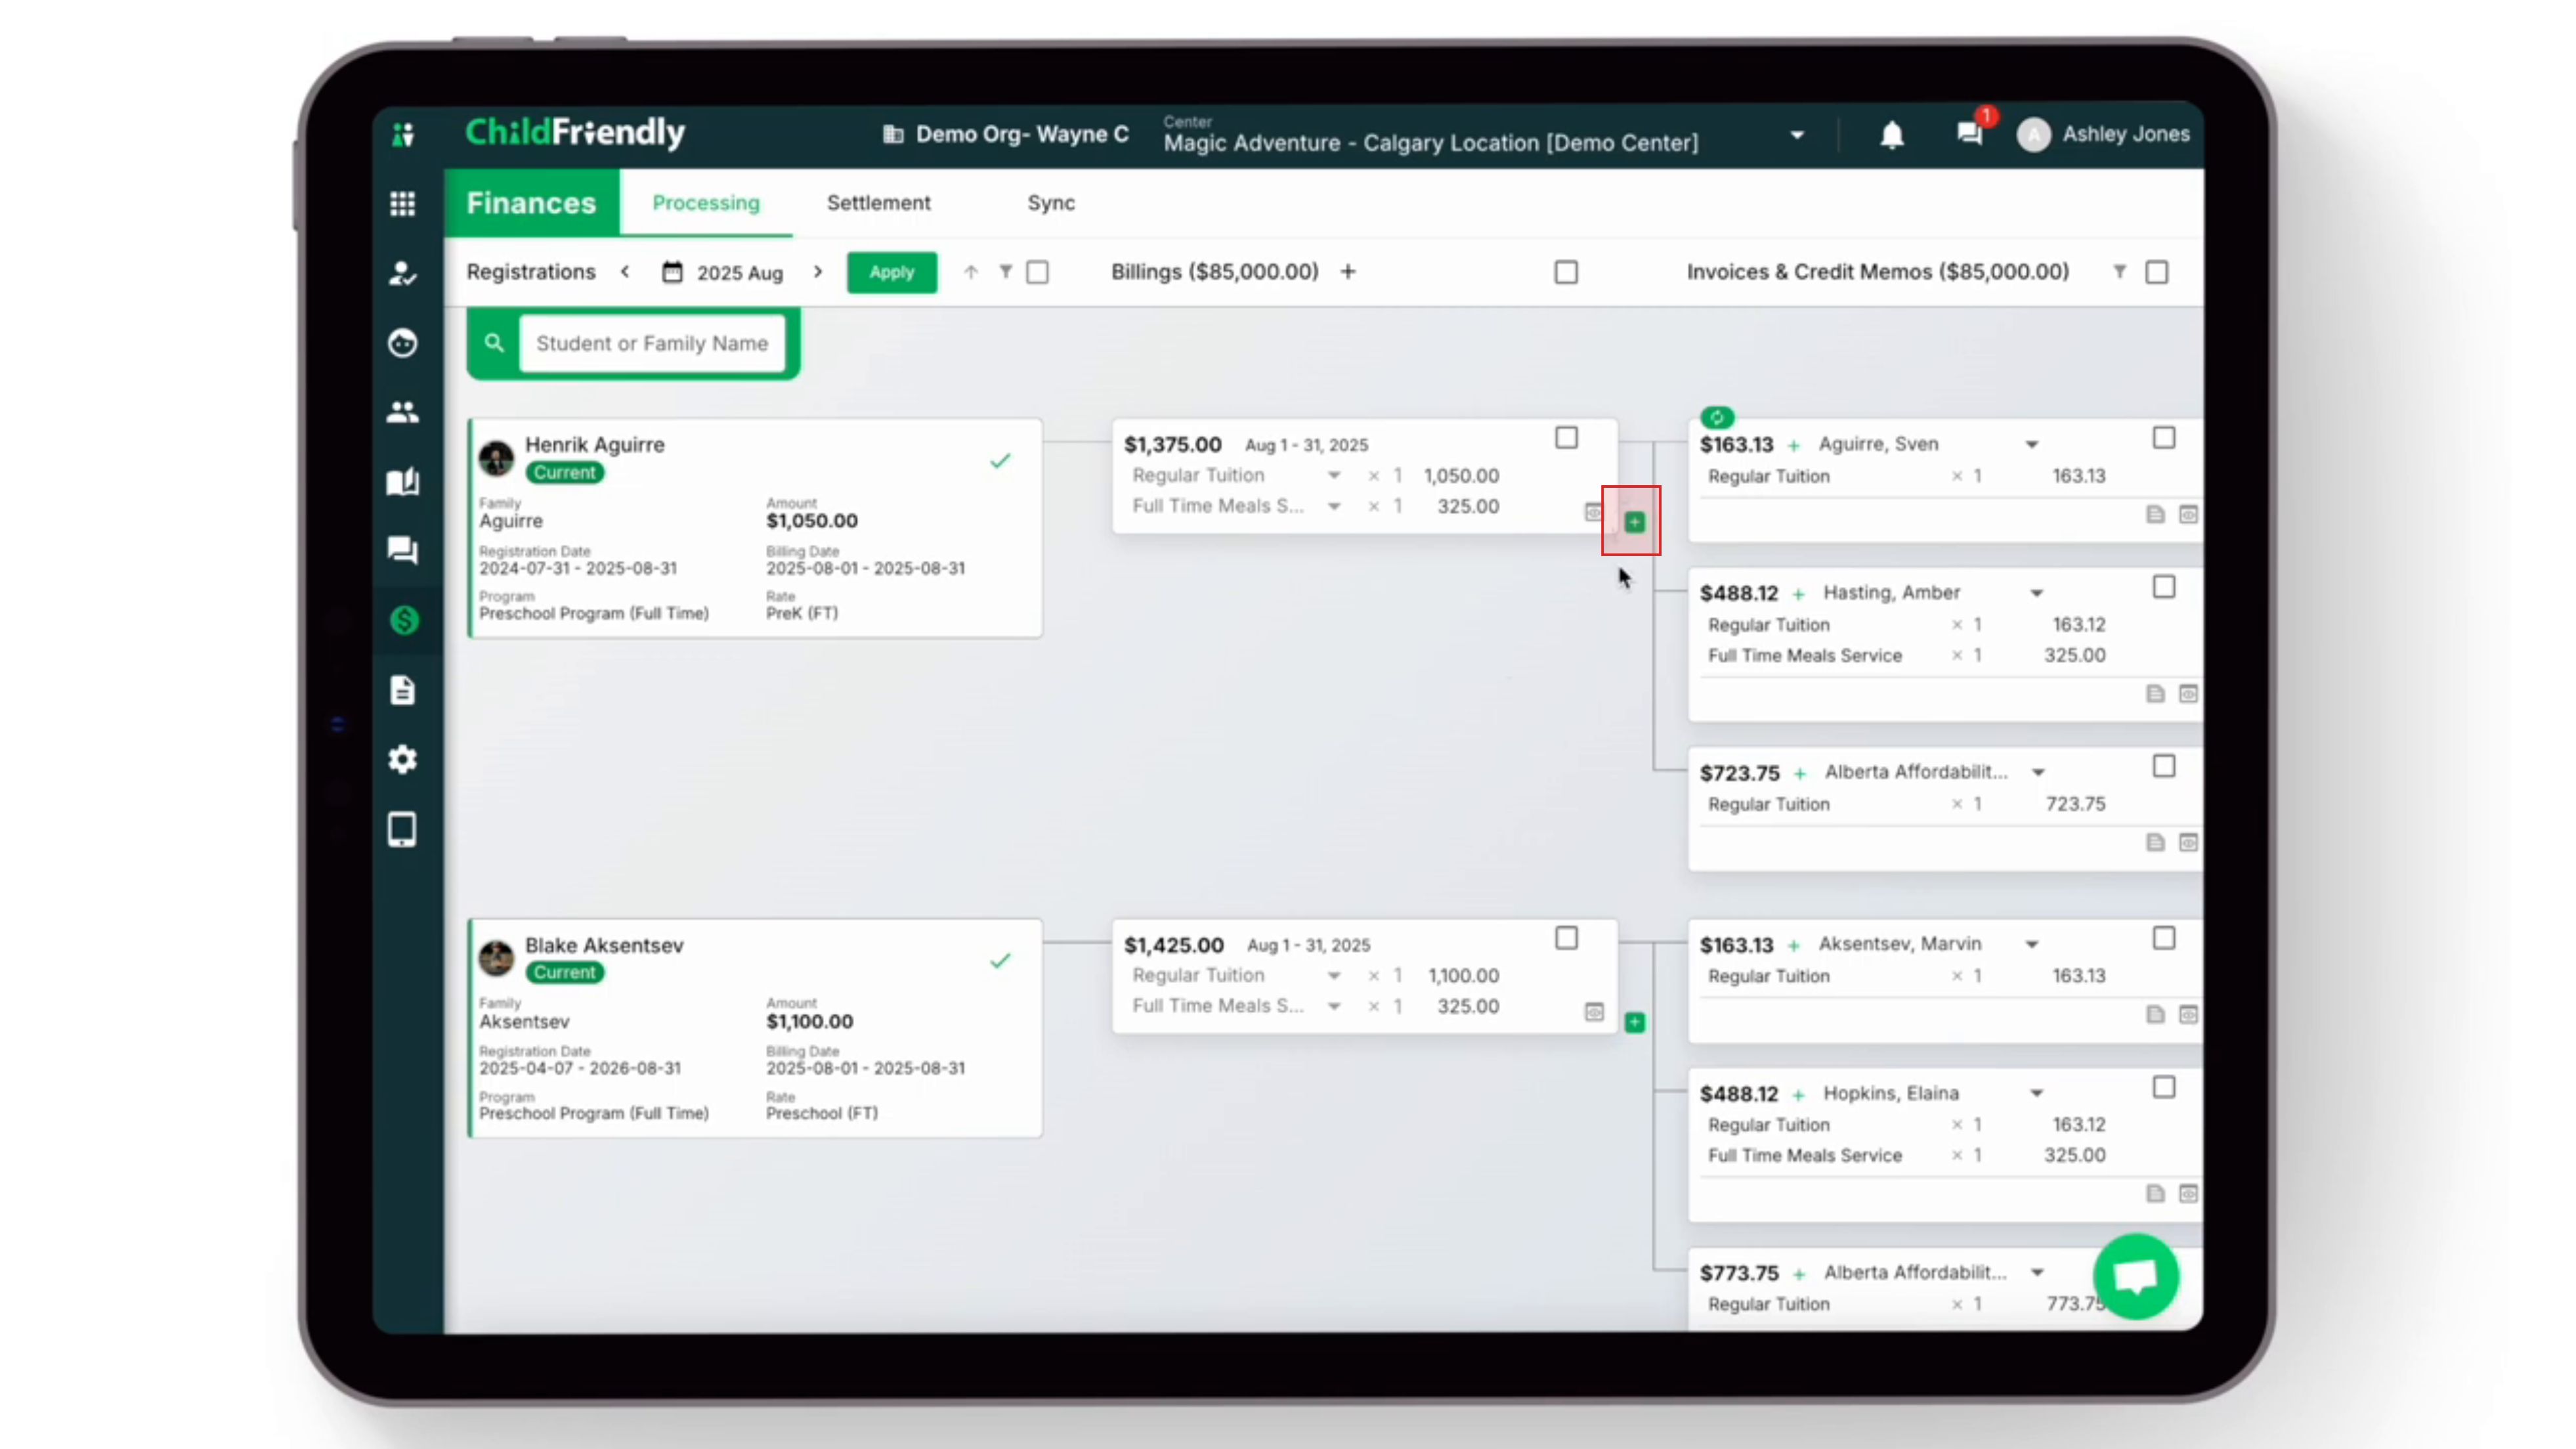
Select the sponsor or payee who is responsible for this invoice.
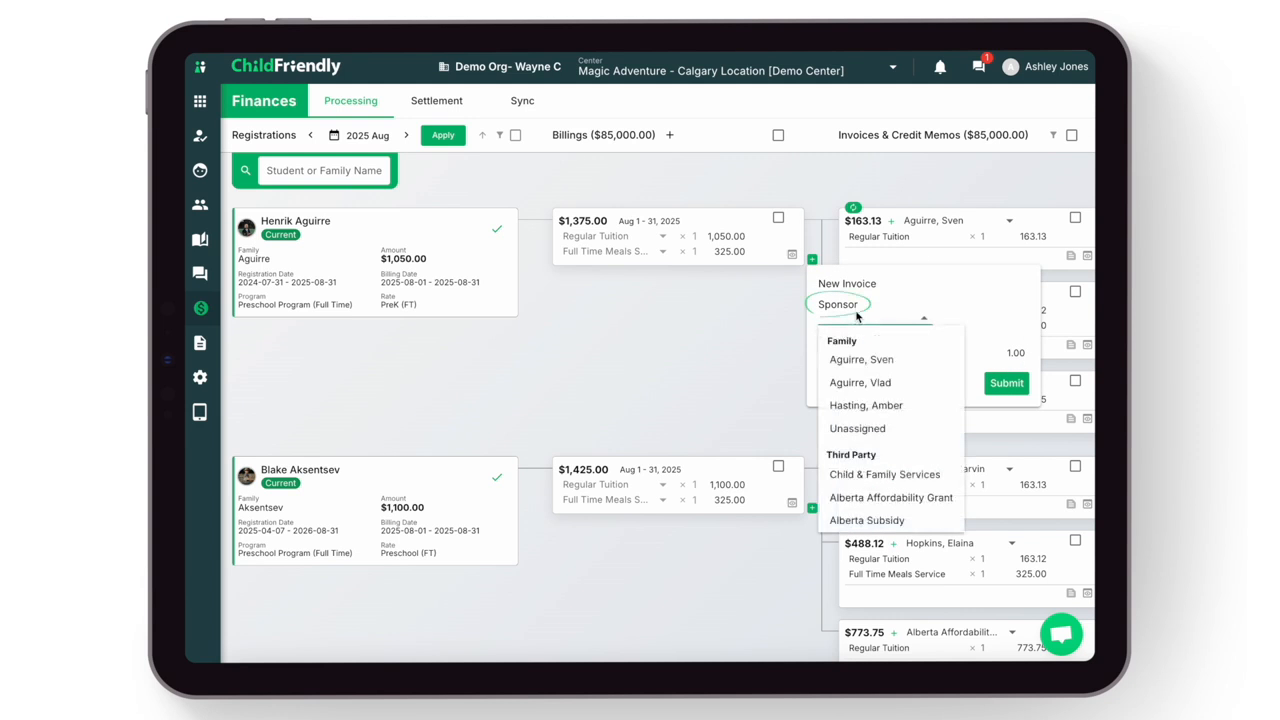
Next, select a line item to specify what the additional amount is for.


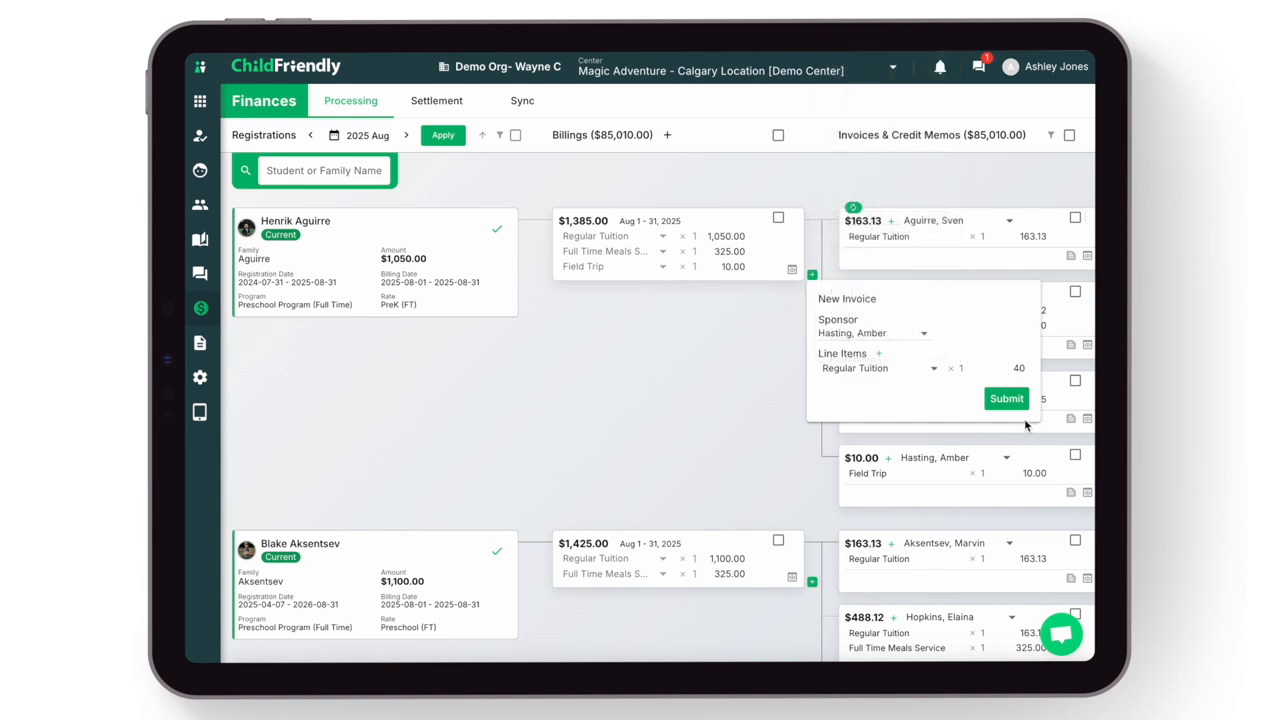
Click the Submit button.
A new invoice will now be added to this billing.
In the example shown, the regular tuition amount for the child is $1,050. If you add a new line item for tuition, the system recognizes that a tuition amount already exists and adds the new amount to the existing one.
As a result, the regular tuition amount adjusts to $1,090.
Step 10: Create a Custom (One-Time) Billing
Use the Custom Billing feature for one-time charges such as field trips or late payment penalty fees.
Click the plus icon beside Billings to start a new custom billing.
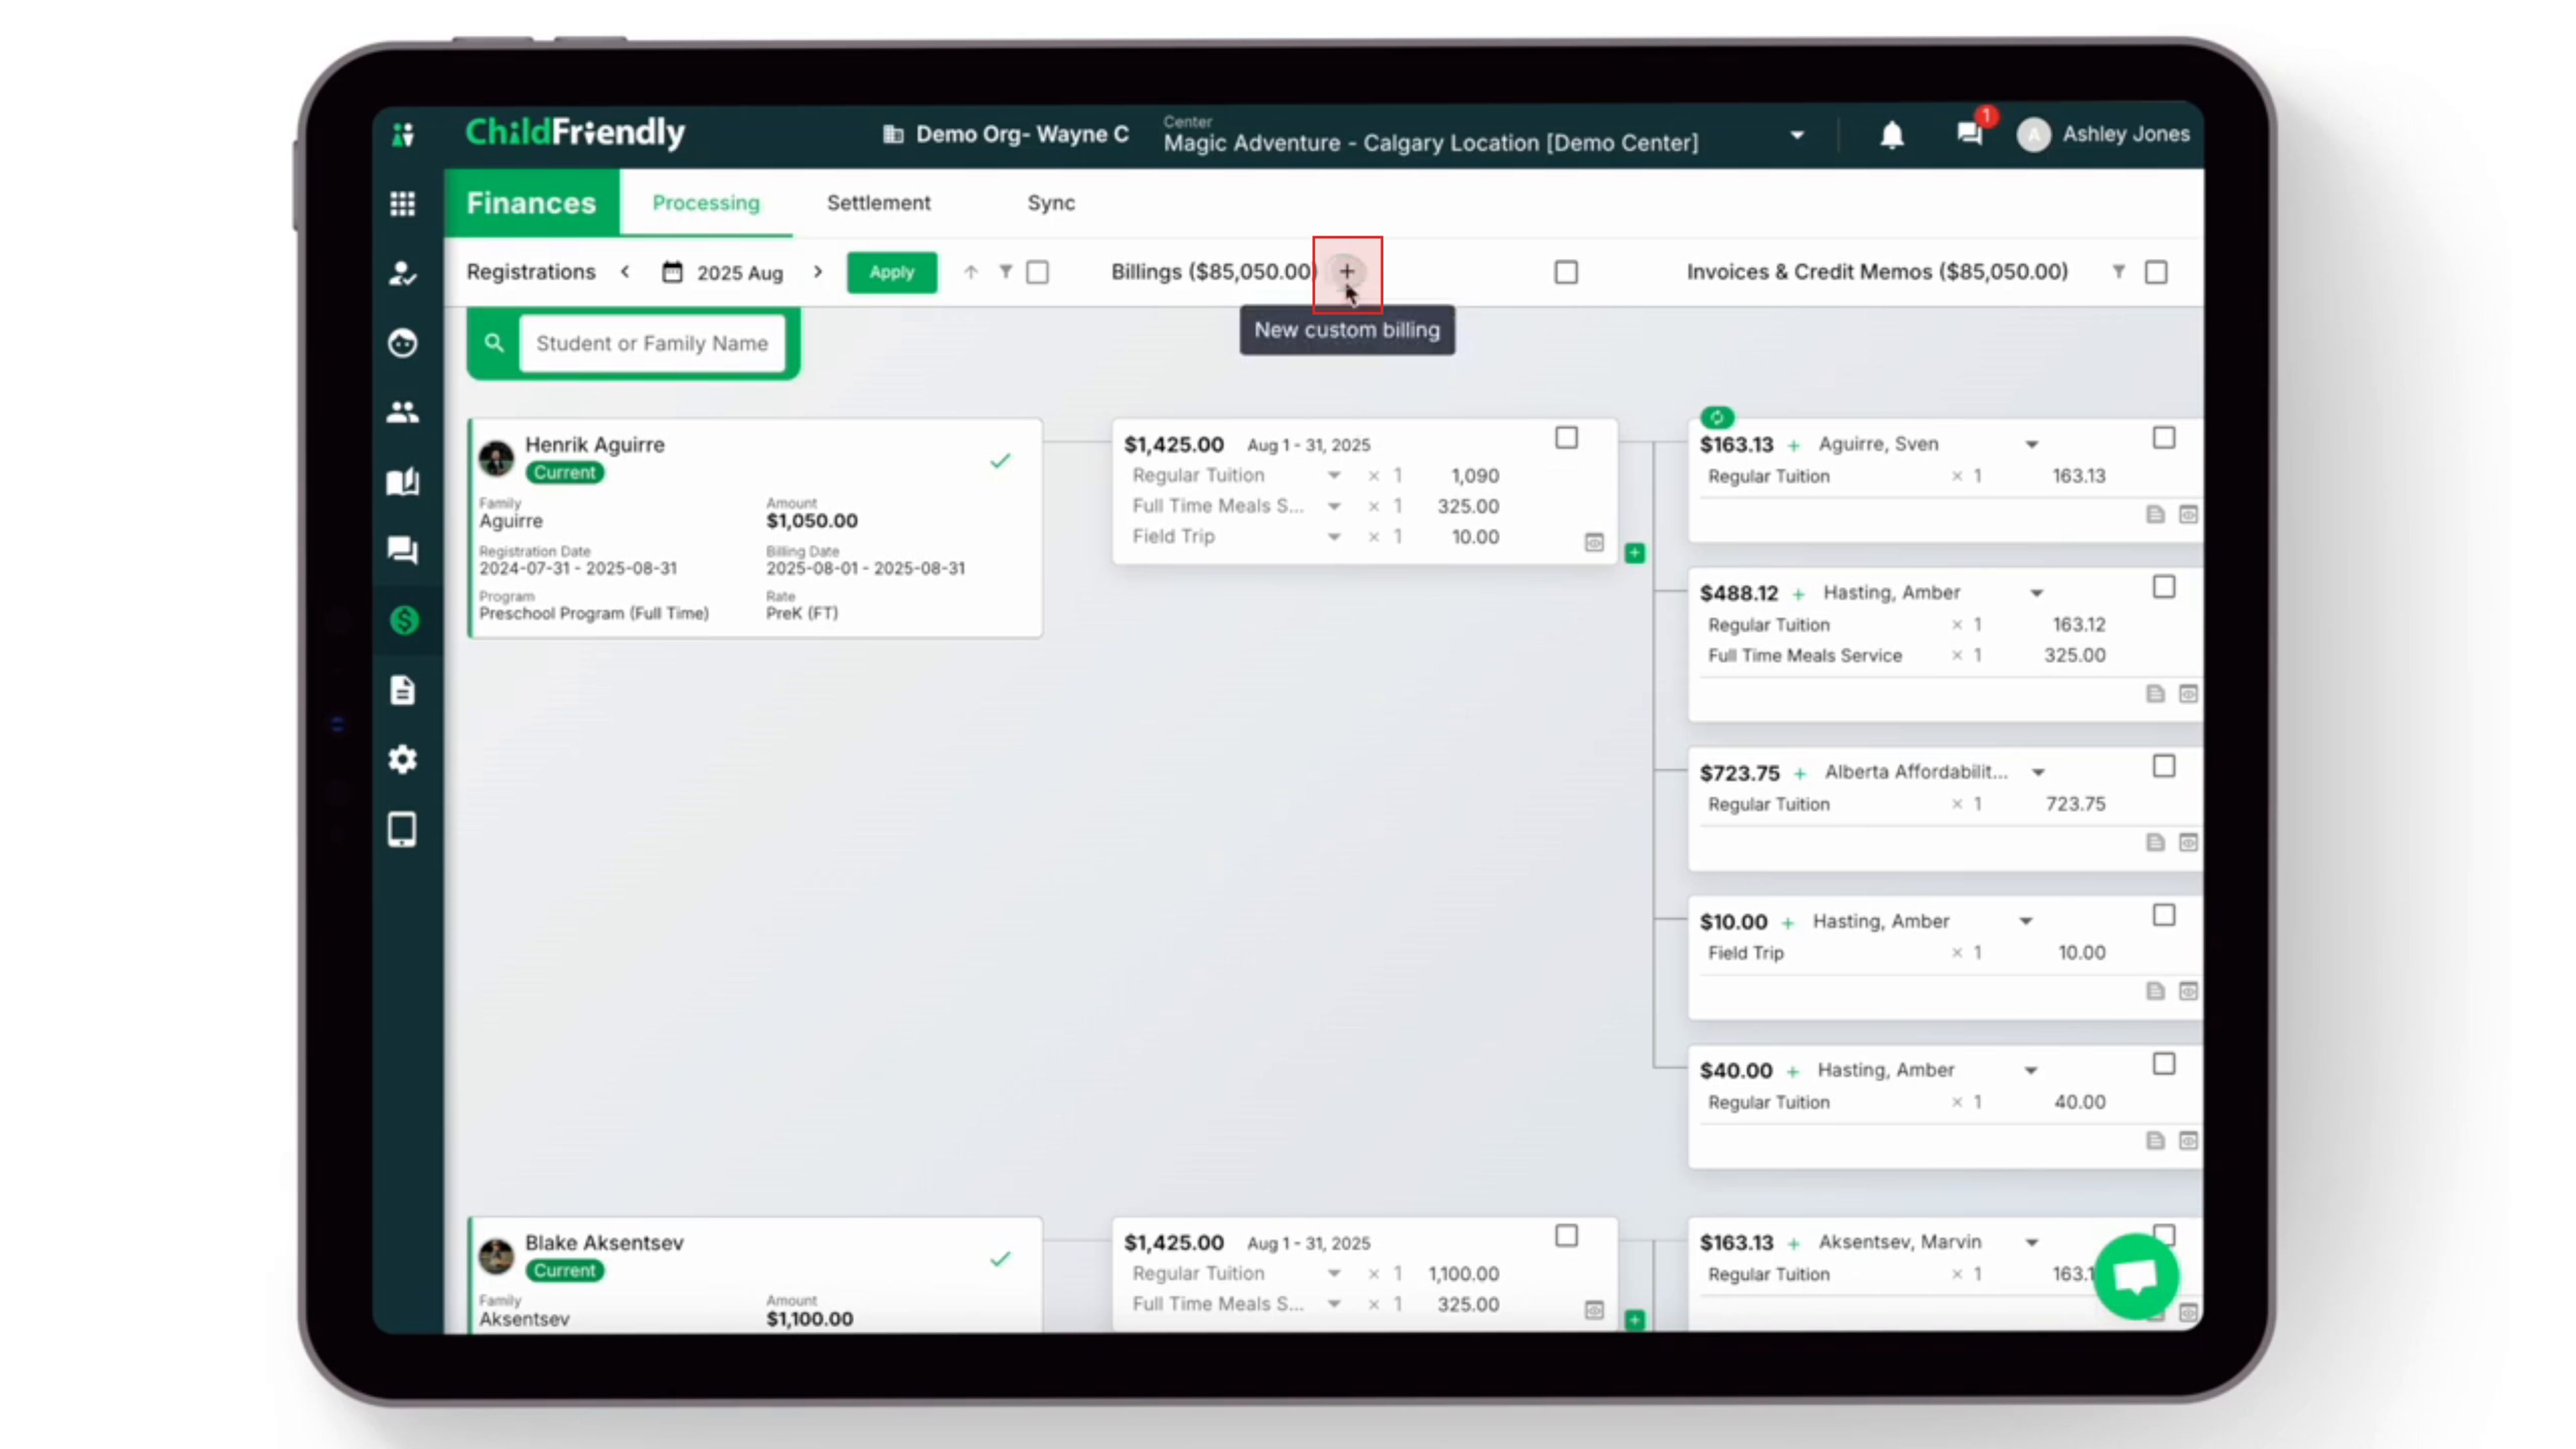
Select the family and then choose the child to link the billing to.

Select the appropriate line item. Enter a new amount or edit the predefined amount from the catalog.


Select the Credit Counterpart box if you would like to create an offsetting credit on the ledger for the same amount as the billing. For example, if a family pays a deposit that should remain on their account as a credit toward future tuition, you would enter the deposit amount and check the Credit Counterpart box.
Once finished, click Submit to process the billing
Step 11: Assign Custom Billing to a Sponsor and Save
Find the newly created billing. It will say unassigned if more than one parent or sponsor is attached to the child.
Open the dropdown beside Unassigned and select the sponsor who should receive the invoice.

Click the Save button to confirm the change.
The billing will now be added to that parent or sponsor’s invoice.
Note that custom billings can also be created directly in the Families module within the ledger.
Lastly, you can create or enter a payment for this new invoice. If the parent is set up with PAD, a PAD icon will appear. PAD payments can also be processed in bulk by selecting all families and choosing Bulk PAD payments.

Refer to the payments training video for instructions on adding payments.
Step 12: Generate Billings After the Main Bulk Run
Sometimes children will register and start after the billings for a period have already been generated. If this occurs, simply use the filter icon to find registrations without billings.
Click the filter icon and select Registrations without billings.
You will then see any registrations that do not yet have billings generated.
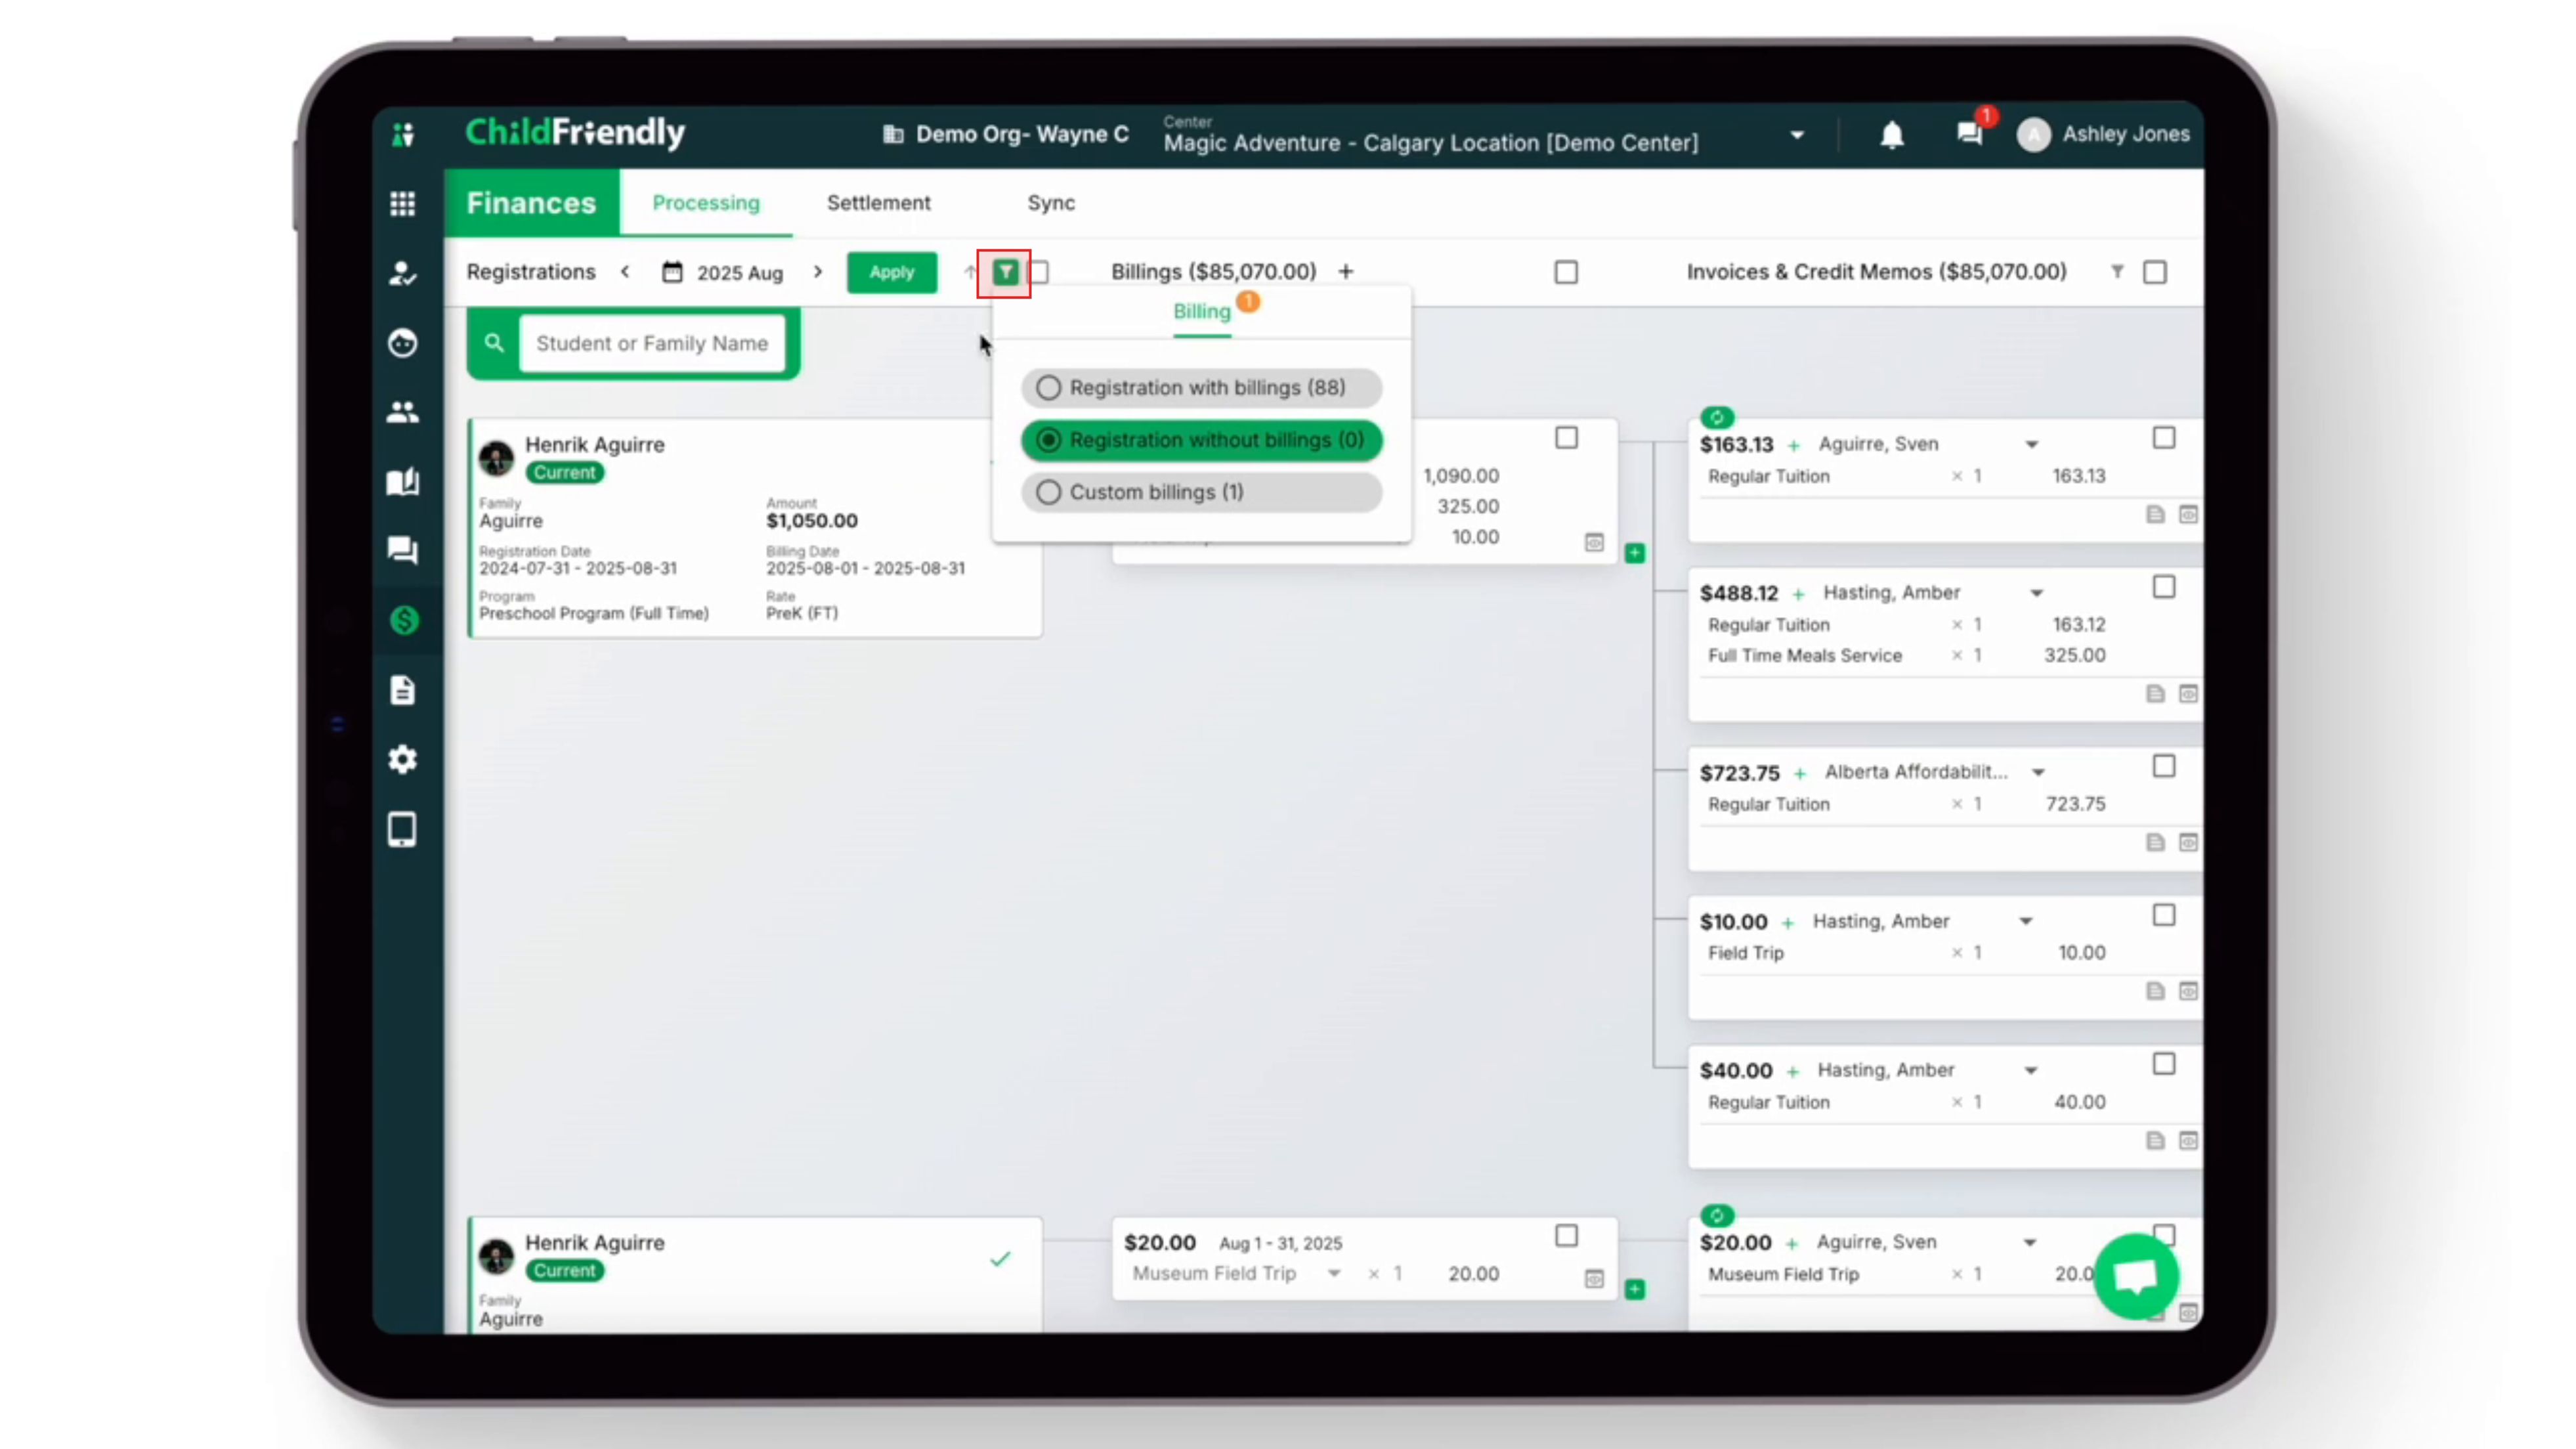
Regularly check through the month to ensure no new mid month starting children are missed!
Step 13: Delete a Billing (If No Payment Has Been Made)
You can delete a billing as long as no payment has been applied to it. This is useful if a child’s withdrawal date was not entered and they were billed in error.
Locate the billing, select the three dots menu, and click Delete billing.
This will remove the billing from the system.

Note: If a manual payment was recorded in error, you can delete the manual payment. However, PAD and credit card (CC) payments are automatically processed and cannot be deleted.
Was this helpful?
Still need help? Ask the team